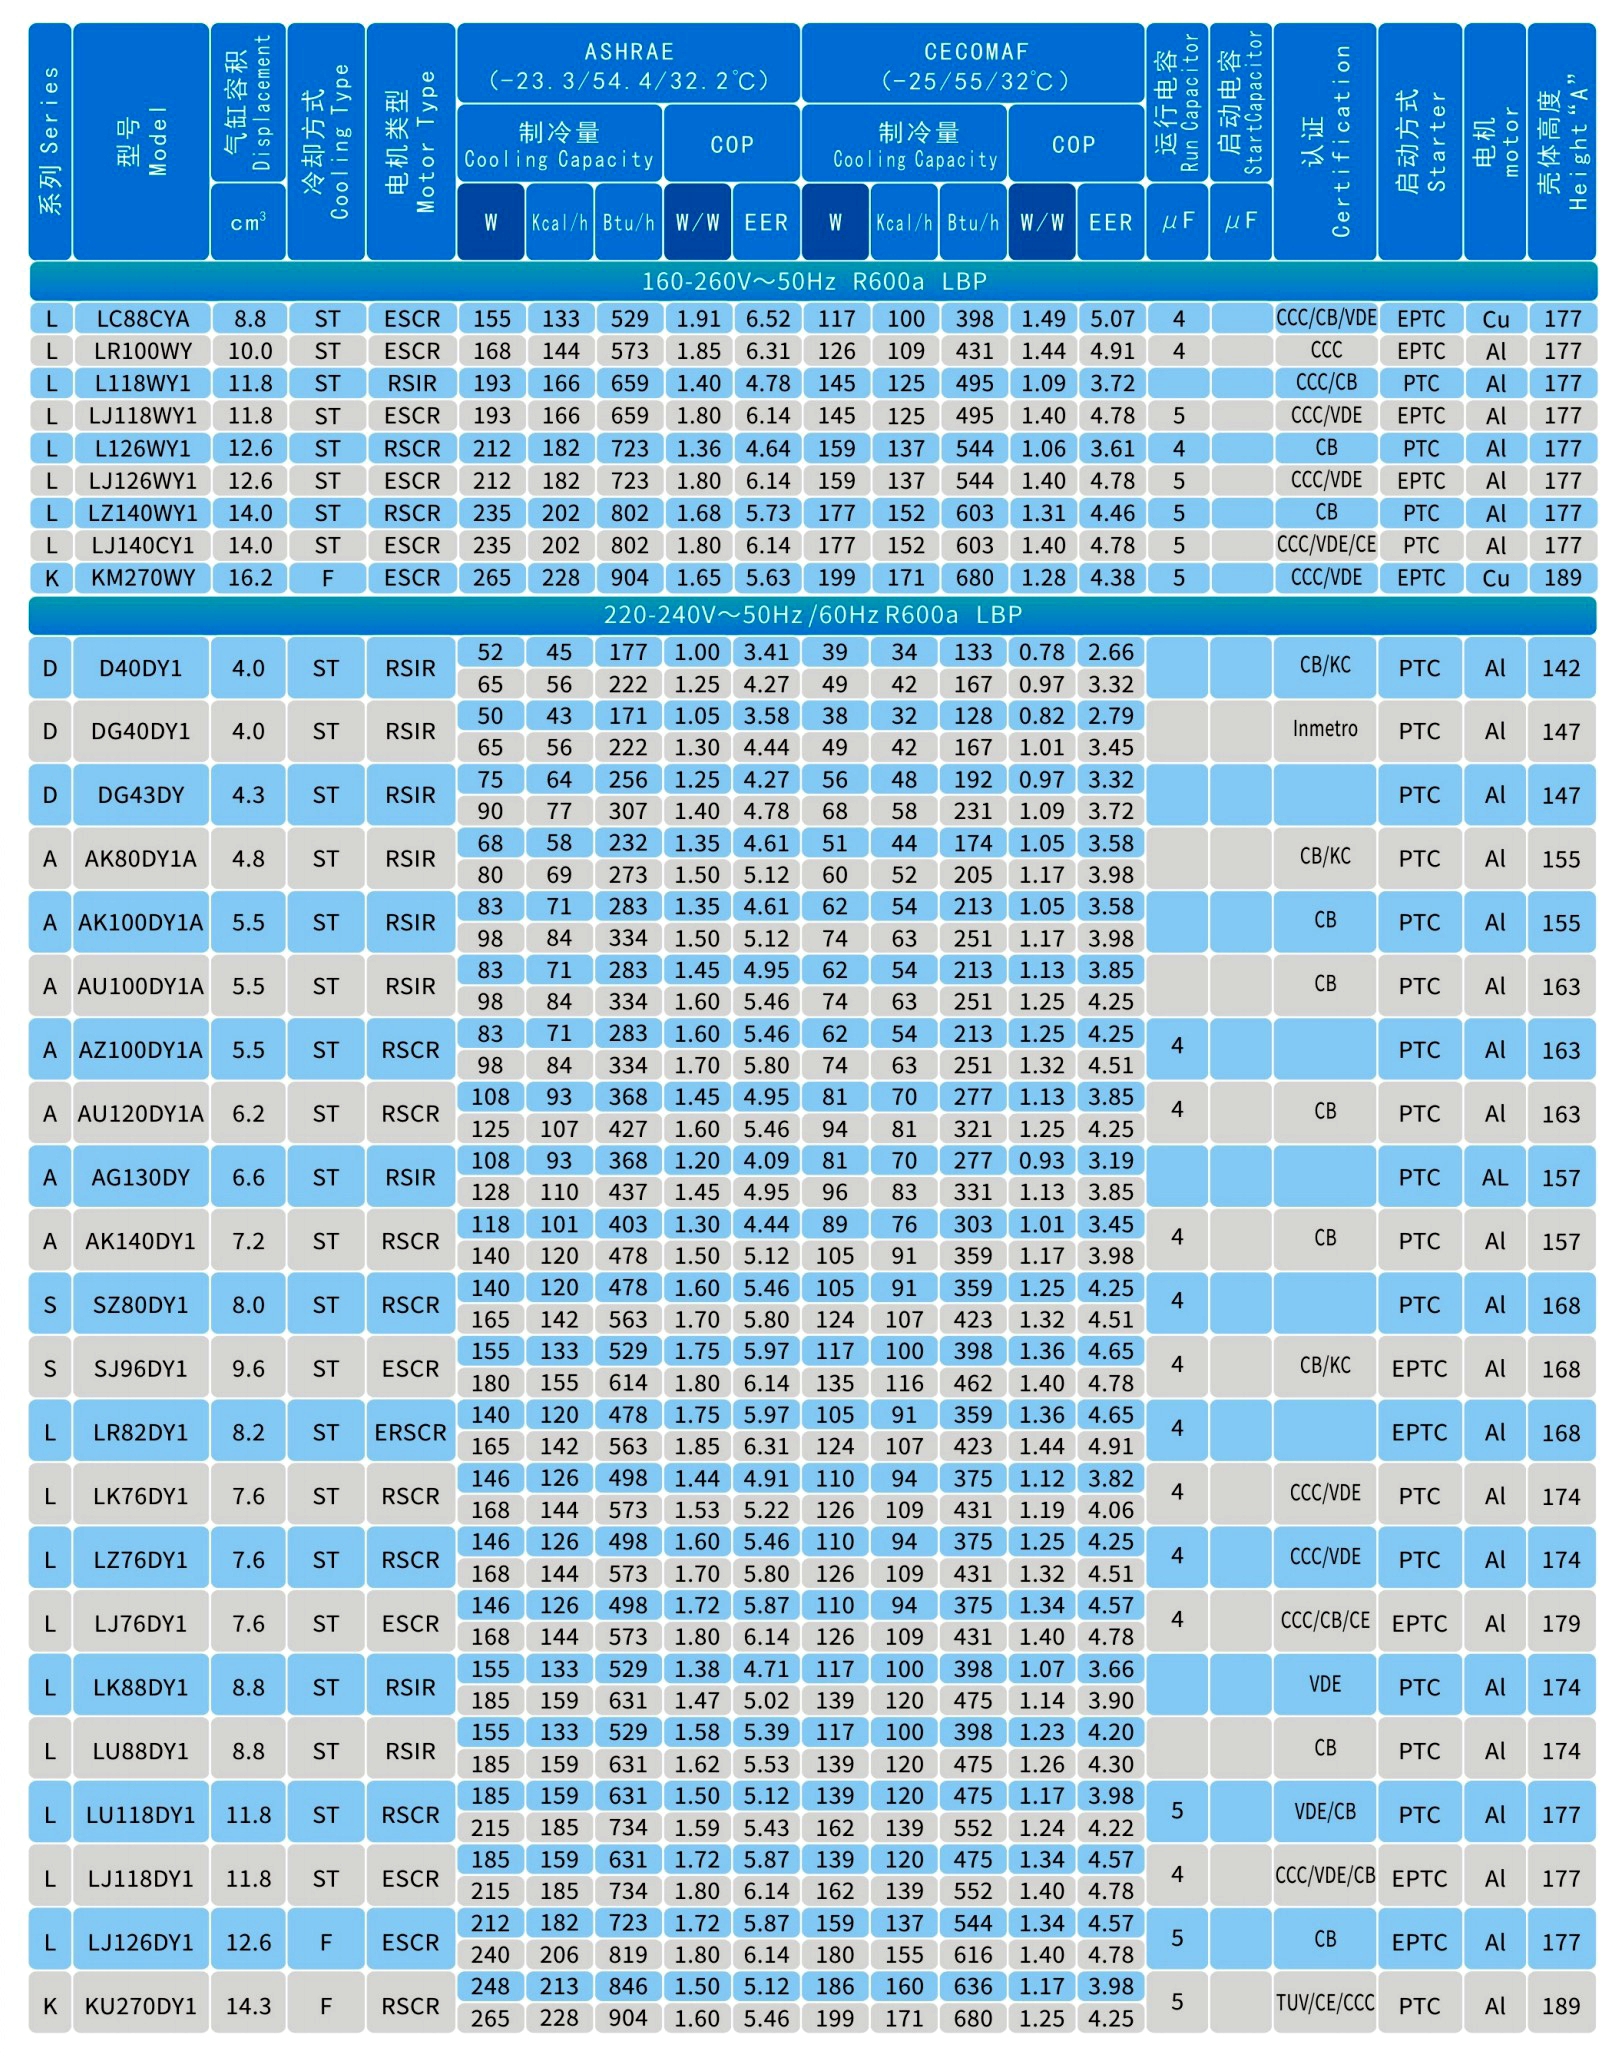
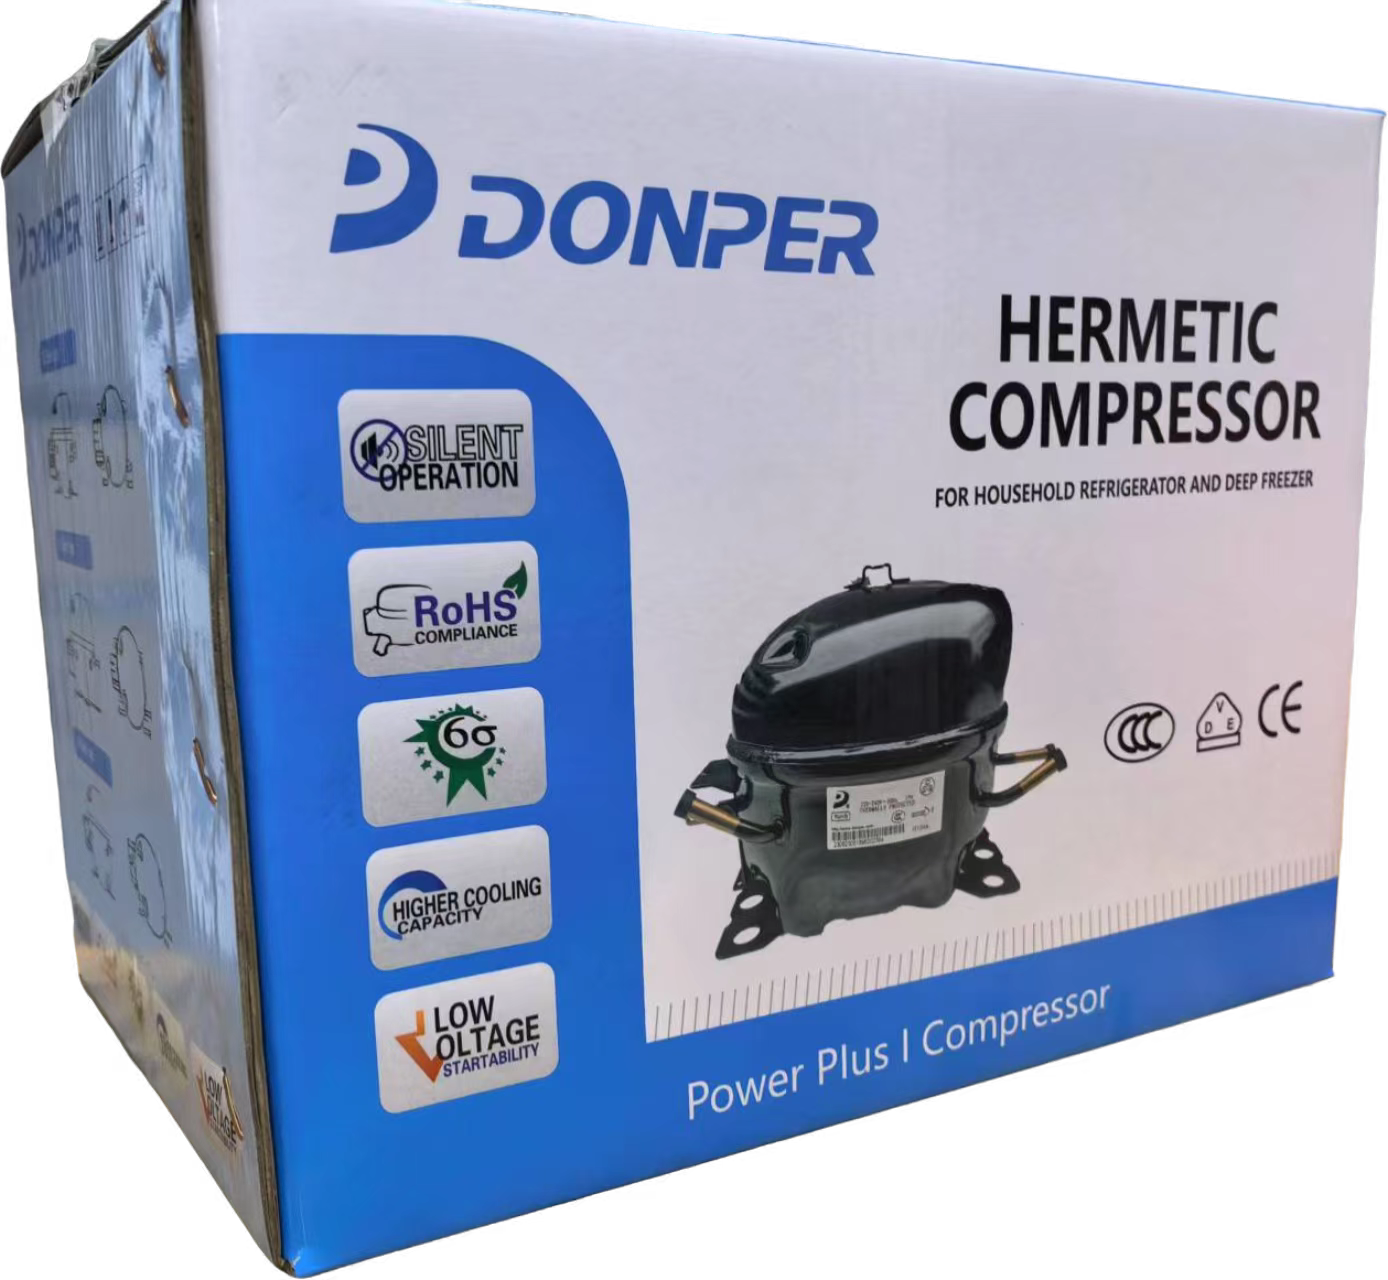
DONPER Compressor L118CY1 Product Description
DONPER Compressor L118CY1 is an efficient and reliable refrigeration component designed to meet the refrigeration needs of a variety of household and commercial appliances.
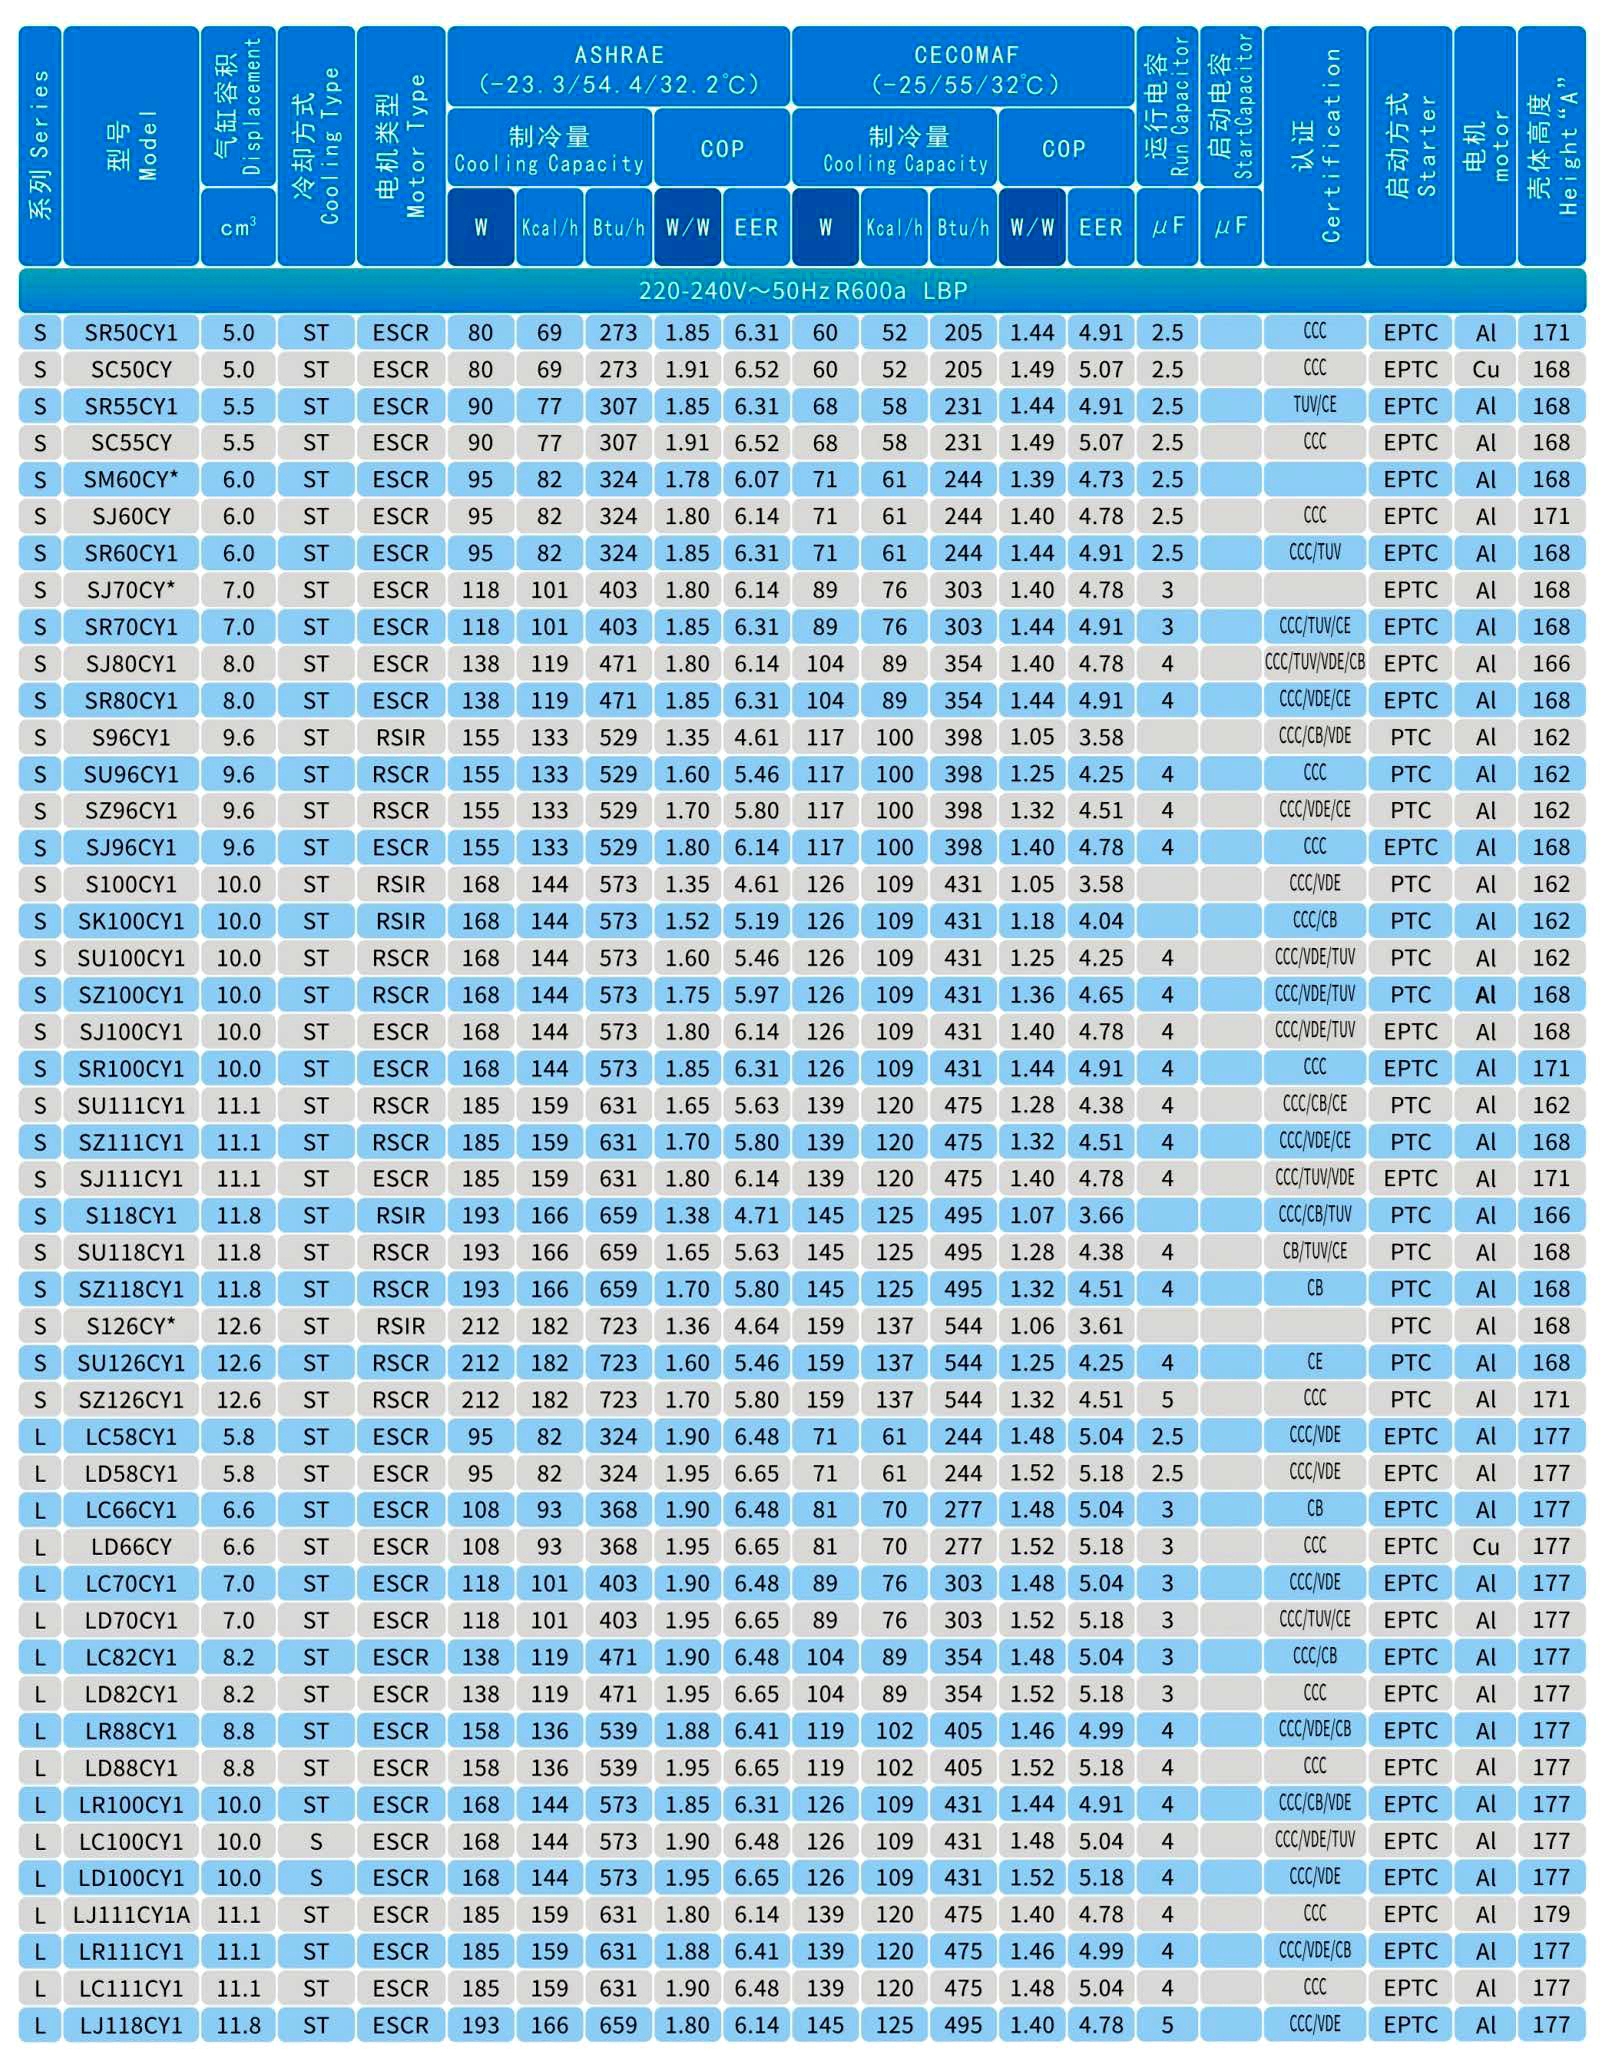
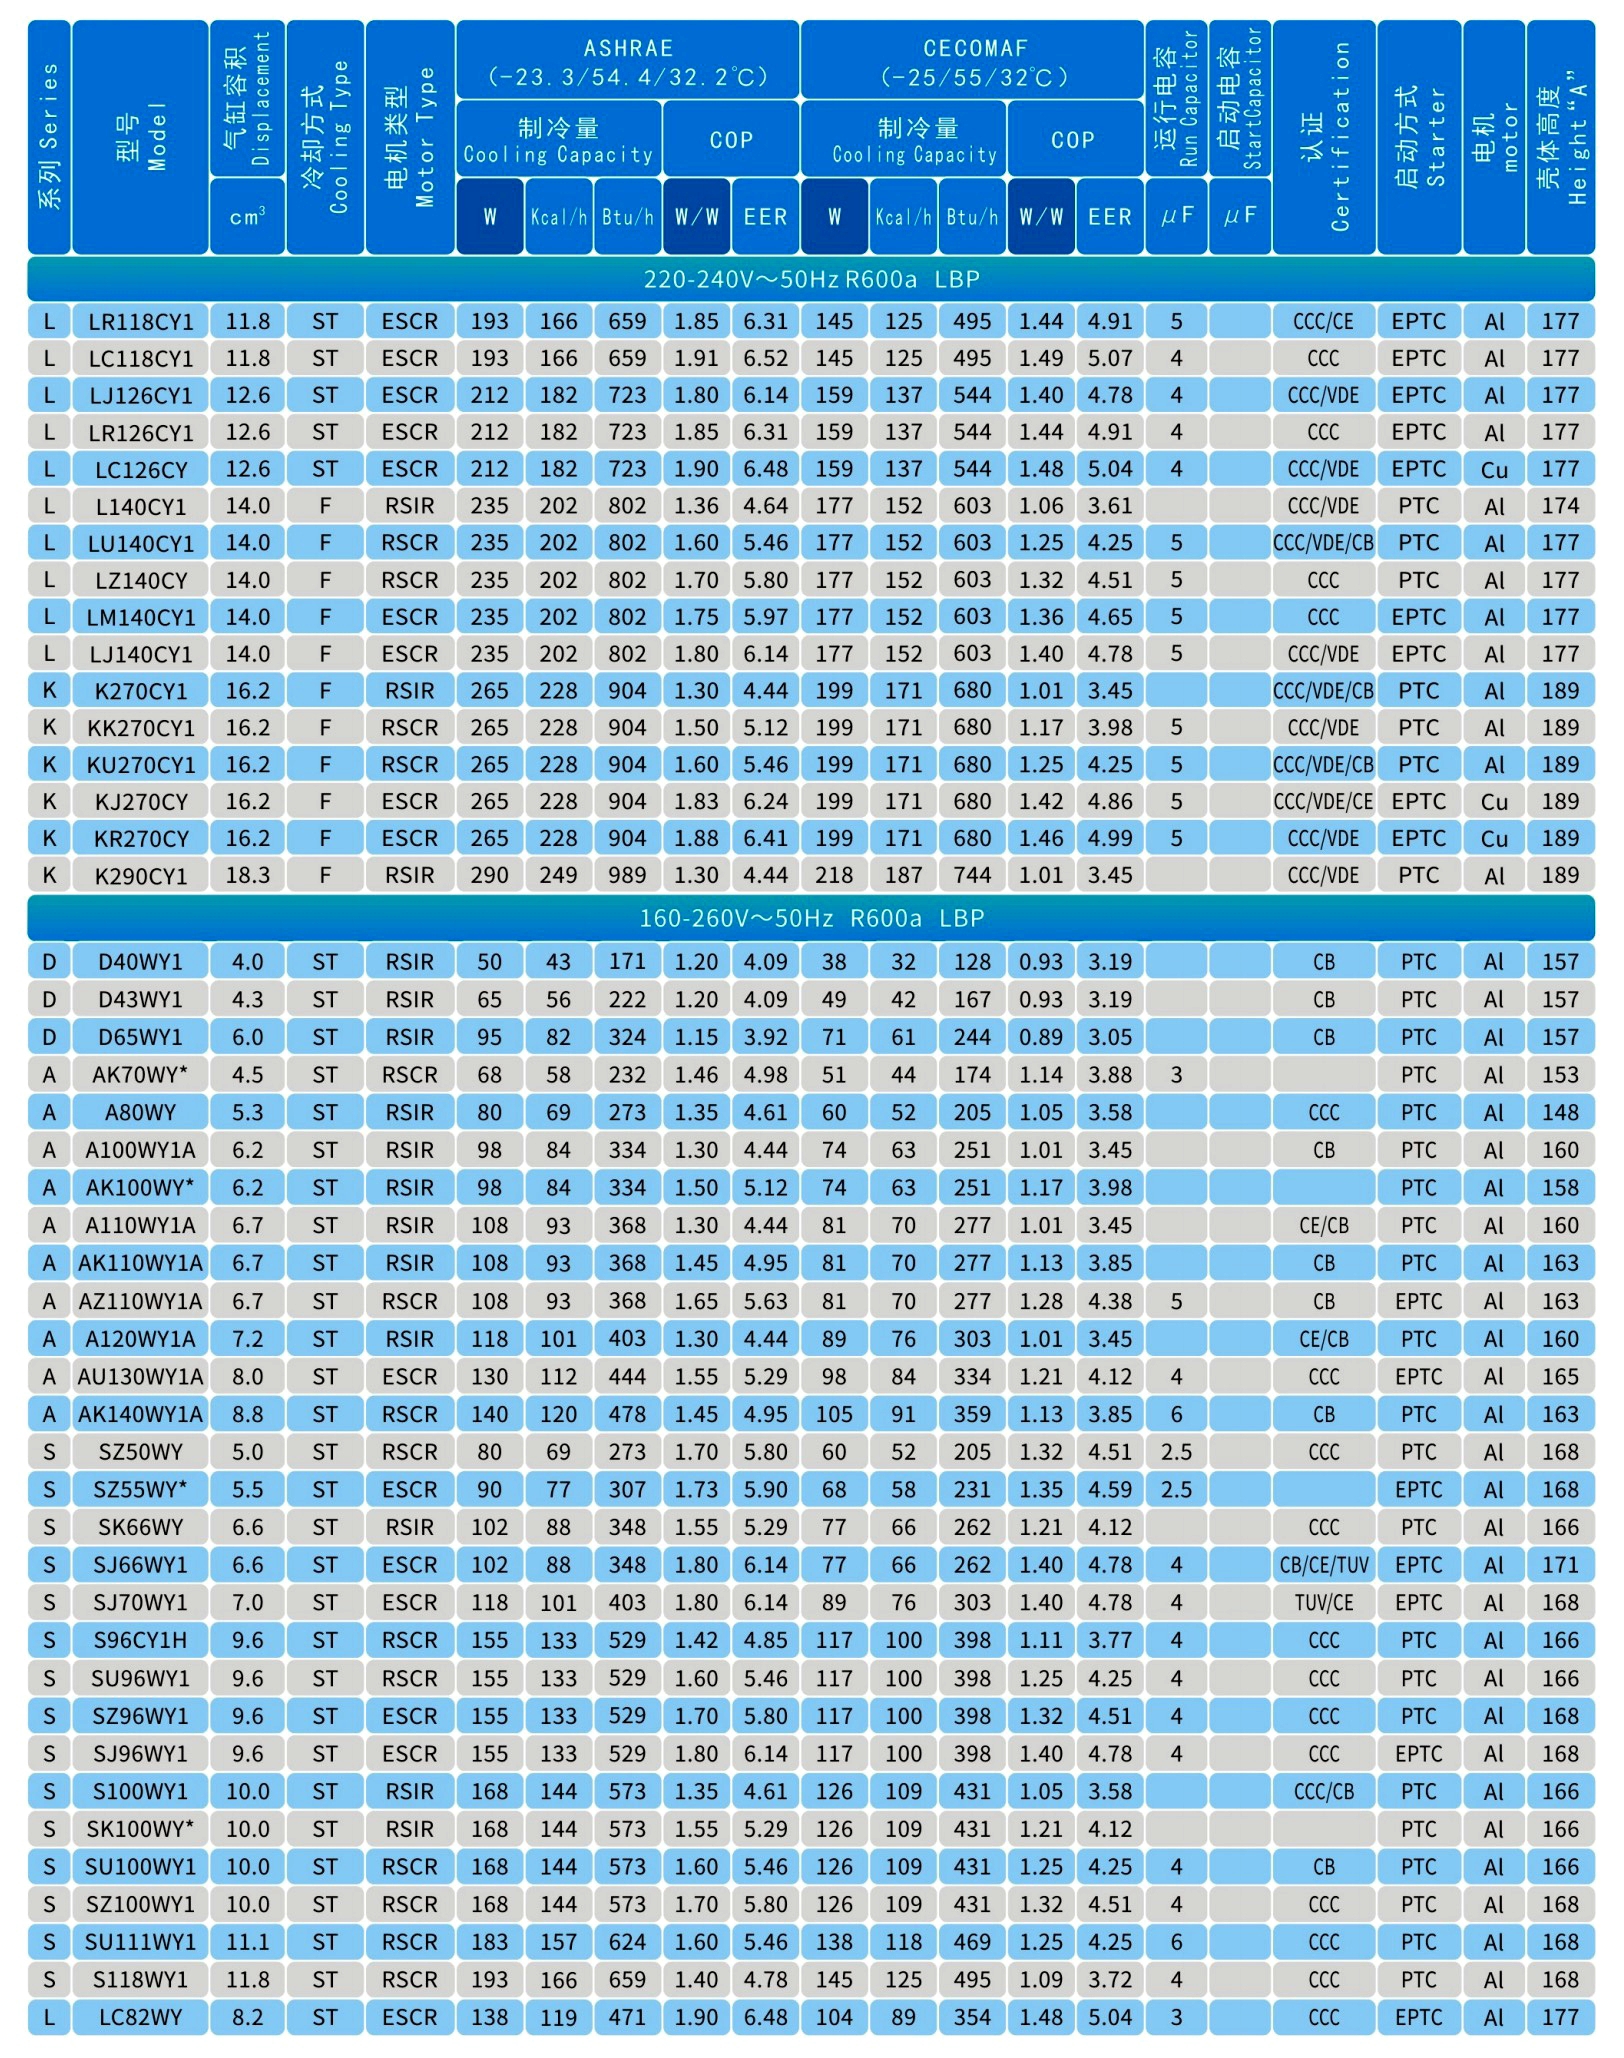
1. Brand and Model: L118CY1 is manufactured by DONPER, a well-known brand in the compressor industry, and is a perfect combination of advanced technology and exquisite craftsmanship.
2. Refrigerant: The compressor uses R600a refrigerant, a hydrocarbon refrigerant known for its excellent thermodynamic properties. R600a has high energy efficiency, minimal impact on the environment, zero ozone depletion potential, and extremely low global warming potential, making it an environmentally friendly choice for modern refrigeration systems.
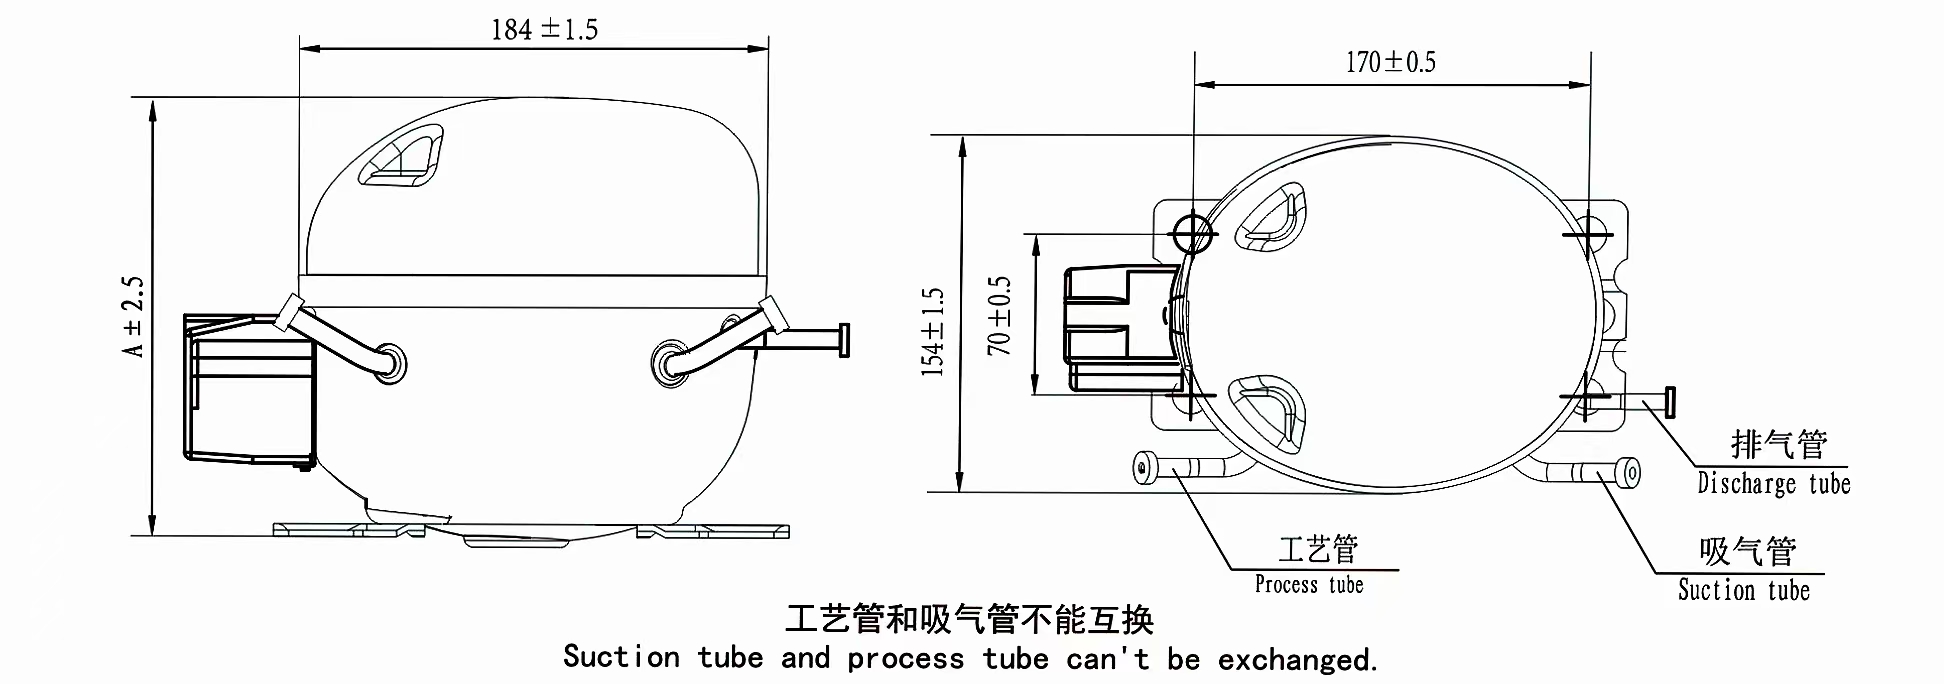
3. Type and Structure: The L118CY1 compressor adopts a fully sealed design. In this design, the motor and compression mechanism are completely enclosed in a welded steel shell. This fully sealed structure effectively prevents refrigerant leakage, reduces noise and vibration, and protects internal components from dust, moisture and other contaminants, thereby ensuring a long service life and stable operation.
Performance characteristics of DONPER L118CY1 compressor
1. Refrigeration capacity
The L118CY1 compressor has a strong refrigeration capacity, with a rated power of about 230W. This allows it to quickly cool the interior of refrigerators, freezers and small commercial refrigeration equipment. Whether it is keeping food fresh in a home refrigerator or keeping the temperature low in a convenience store display cabinet, the compressor can dissipate heat efficiently to keep the stored items at the desired temperature.
2. Input power and efficiency
The input power of the L118CY1 compressor is about 175W. Its coefficient of performance (COP) is relatively high, usually about 1.3, showing excellent energy-saving performance. High COP means that higher cooling capacity can be produced per unit of electrical energy consumption, thereby reducing users' electricity bills and promoting energy conservation and emission reduction.
3. Operating conditions
The compressor is designed to operate in the voltage range of 160-240V and the frequency is 50Hz, which can adapt to various power grids. It can also operate reliably in ambient temperatures ranging from -30°C to +43°C, ensuring stable operation in a variety of climatic conditions and usage scenarios, whether it is cold winter or hot summer.
4. Durability and reliability
The DONPER L118CY1 compressor is made of high-quality materials. The outer shell is made of durable steel and the internal components are precision-machined to ensure smooth operation. The fully sealed design and strict quality control during the manufacturing process ensure the long-term durability of the compressor. In addition, the compressor is equipped with built-in protection mechanisms such as overcurrent protection and overtemperature protection, which can effectively prevent potential damage and ensure the long-term safe and reliable operation of the compressor.

DONPER L118CY1 compressor installation steps
Preparation before installation
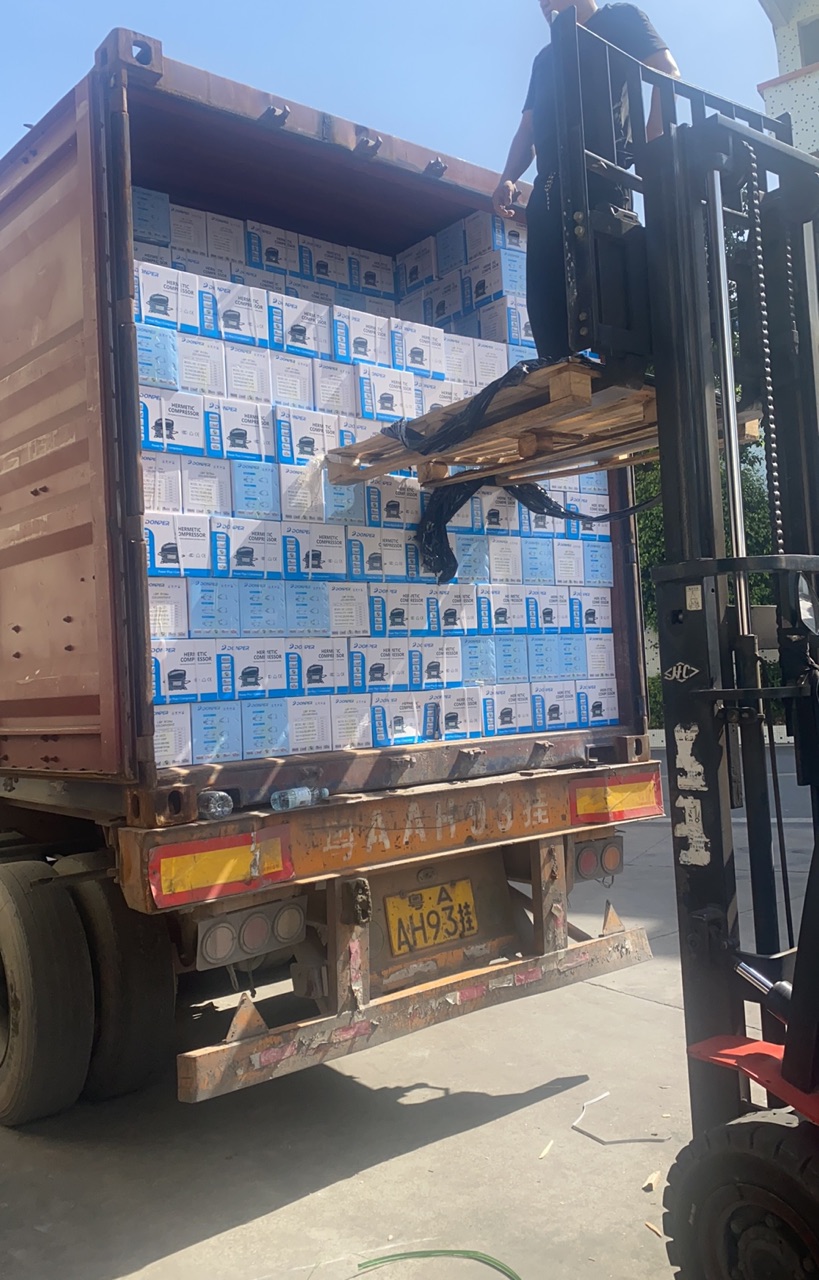
1. Inspection: After receiving the L118CY1 compressor, please inspect it carefully. Check for any signs of physical damage, such as dents on the outer shell, loose parts or cracks. In addition, please confirm that all necessary accessories and documents (such as installation manuals and warranty cards) are included.
2. Work area setup: Clean the installation area thoroughly to remove dust, debris and any potential contaminants. A clean environment helps prevent foreign matter from entering the compressor or refrigeration system during installation, which could cause performance issues or component damage.
3. Safety precautions: Wear appropriate safety gear, such as gloves and goggles, to protect yourself from potential hazards during installation.
Installation location determination
1. Stability: Choose a flat and stable surface to mount the compressor. Make sure the surface can support the weight of the compressor and withstand any vibrations generated during operation. An unstable base can cause excessive noise, excessive vibration, and may even cause premature wear of compressor components.
2. Ventilation: Good ventilation is essential for compressors. The compressor generates heat during operation, and proper airflow around the compressor helps dissipate heat. Make sure there is enough space around the compressor, leaving at least 10-15 cm of clearance on all sides to ensure good air circulation.
3. Keep away from interference sources: Keep the compressor away from sources of electromagnetic interference, such as large appliances or power transformers. This helps prevent electrical interference that may affect the normal operation of the compressor.
Install the compressor
1. Base installation: If necessary, install a suitable mounting base for the compressor. Use suitable fasteners (such as bolts and nuts) to securely fasten the compressor to the base. Make sure the compressor is installed in the correct direction specified in the installation manual to avoid any problems with oil circulation and component operation.
2. Alignment: During installation, carefully check the alignment of the compressor. The compressor should be level both horizontally and vertically. Improper alignment can cause uneven force on internal components, increasing wear and reducing performance.
Connecting refrigerant lines
1. Line preparation: Cut and clean the refrigerant lines to the appropriate length. Make sure the ends of the lines are smooth and free of burrs or debris. Flare or crimp the ends of the lines as required by the connection type.
2. Connection: Connect the refrigerant lines to the inlet and outlet of the compressor according to the system design. Use the correct type of fittings, such as flared fittings or quick-connect fittings, and ensure a tight seal to prevent refrigerant leakage. Apply a sealant or O-ring compatible with the refrigerant as needed.
3. Leak test: After connecting the refrigerant lines, perform a thorough leak test. Use a refrigerant leak detector to check all connection points. If any leaks are found, tighten the joints immediately or replace the faulty parts to ensure the integrity of the refrigeration system.
Lubrication
1. Lubricant type and amount: Refer to the compressor installation manual to determine the correct type and amount of lubricant. Different compressors may require specific lubricants based on their design and operating conditions.
2. Oil filling: Using a suitable oil filling device, carefully pour the required amount of lubricant into the compressor. Make sure the oil level is within the range recommended in the manual. Proper lubrication is essential for the smooth operation of the compressor's moving parts to reduce friction and wear.
Electrical connection
1. Power supply check: Confirm that the voltage and frequency of the power supply meet the requirements of the compressor. Make sure that the power supply is stable and within the specified operating range.
2. Wiring: Connect the power wires to the electrical terminals of the compressor according to the wiring diagram in the installation manual. Use the appropriate wire size to handle the current without overheating. Make sure all electrical connections are secure and well insulated.
3. Grounding: Make sure the compressor is properly grounded. Grounding is an important safety measure to prevent electrical faults and potential electric shock.
4. Insulation and protection: After completing the electrical connections, check that the insulation is good. Cover all electrical terminals with suitable protective covers to prevent accidental contact with live wires.
Post-installation testing
1. Visual inspection: Before starting the compressor, visually inspect all connections, including refrigerant lines, wires, and mounting bolts to ensure that all parts are properly installed and tightened.
2. Initial startup: Start the compressor and closely monitor its initial operation. Listen for any unusual noises, such as knocking, clicking, or screeching, which may indicate problems with internal components.
3. Performance monitoring: Check the performance parameters of the compressor, such as cooling capacity, suction and discharge pressures, and current consumption. Compare these values with the specifications provided in the compressor manual. Adjust the system as needed to ensure optimal performance.
4. Leak recheck: After the compressor has been running for a short period of time, re-test the refrigerant lines for leaks to ensure that no leaks have occurred during operation.