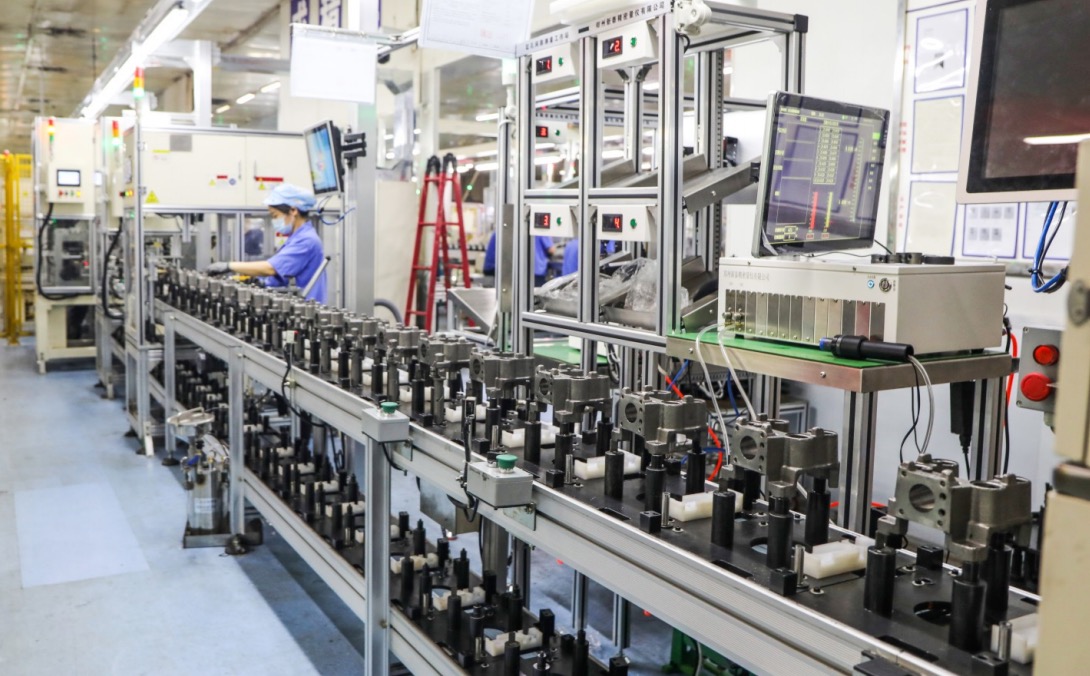
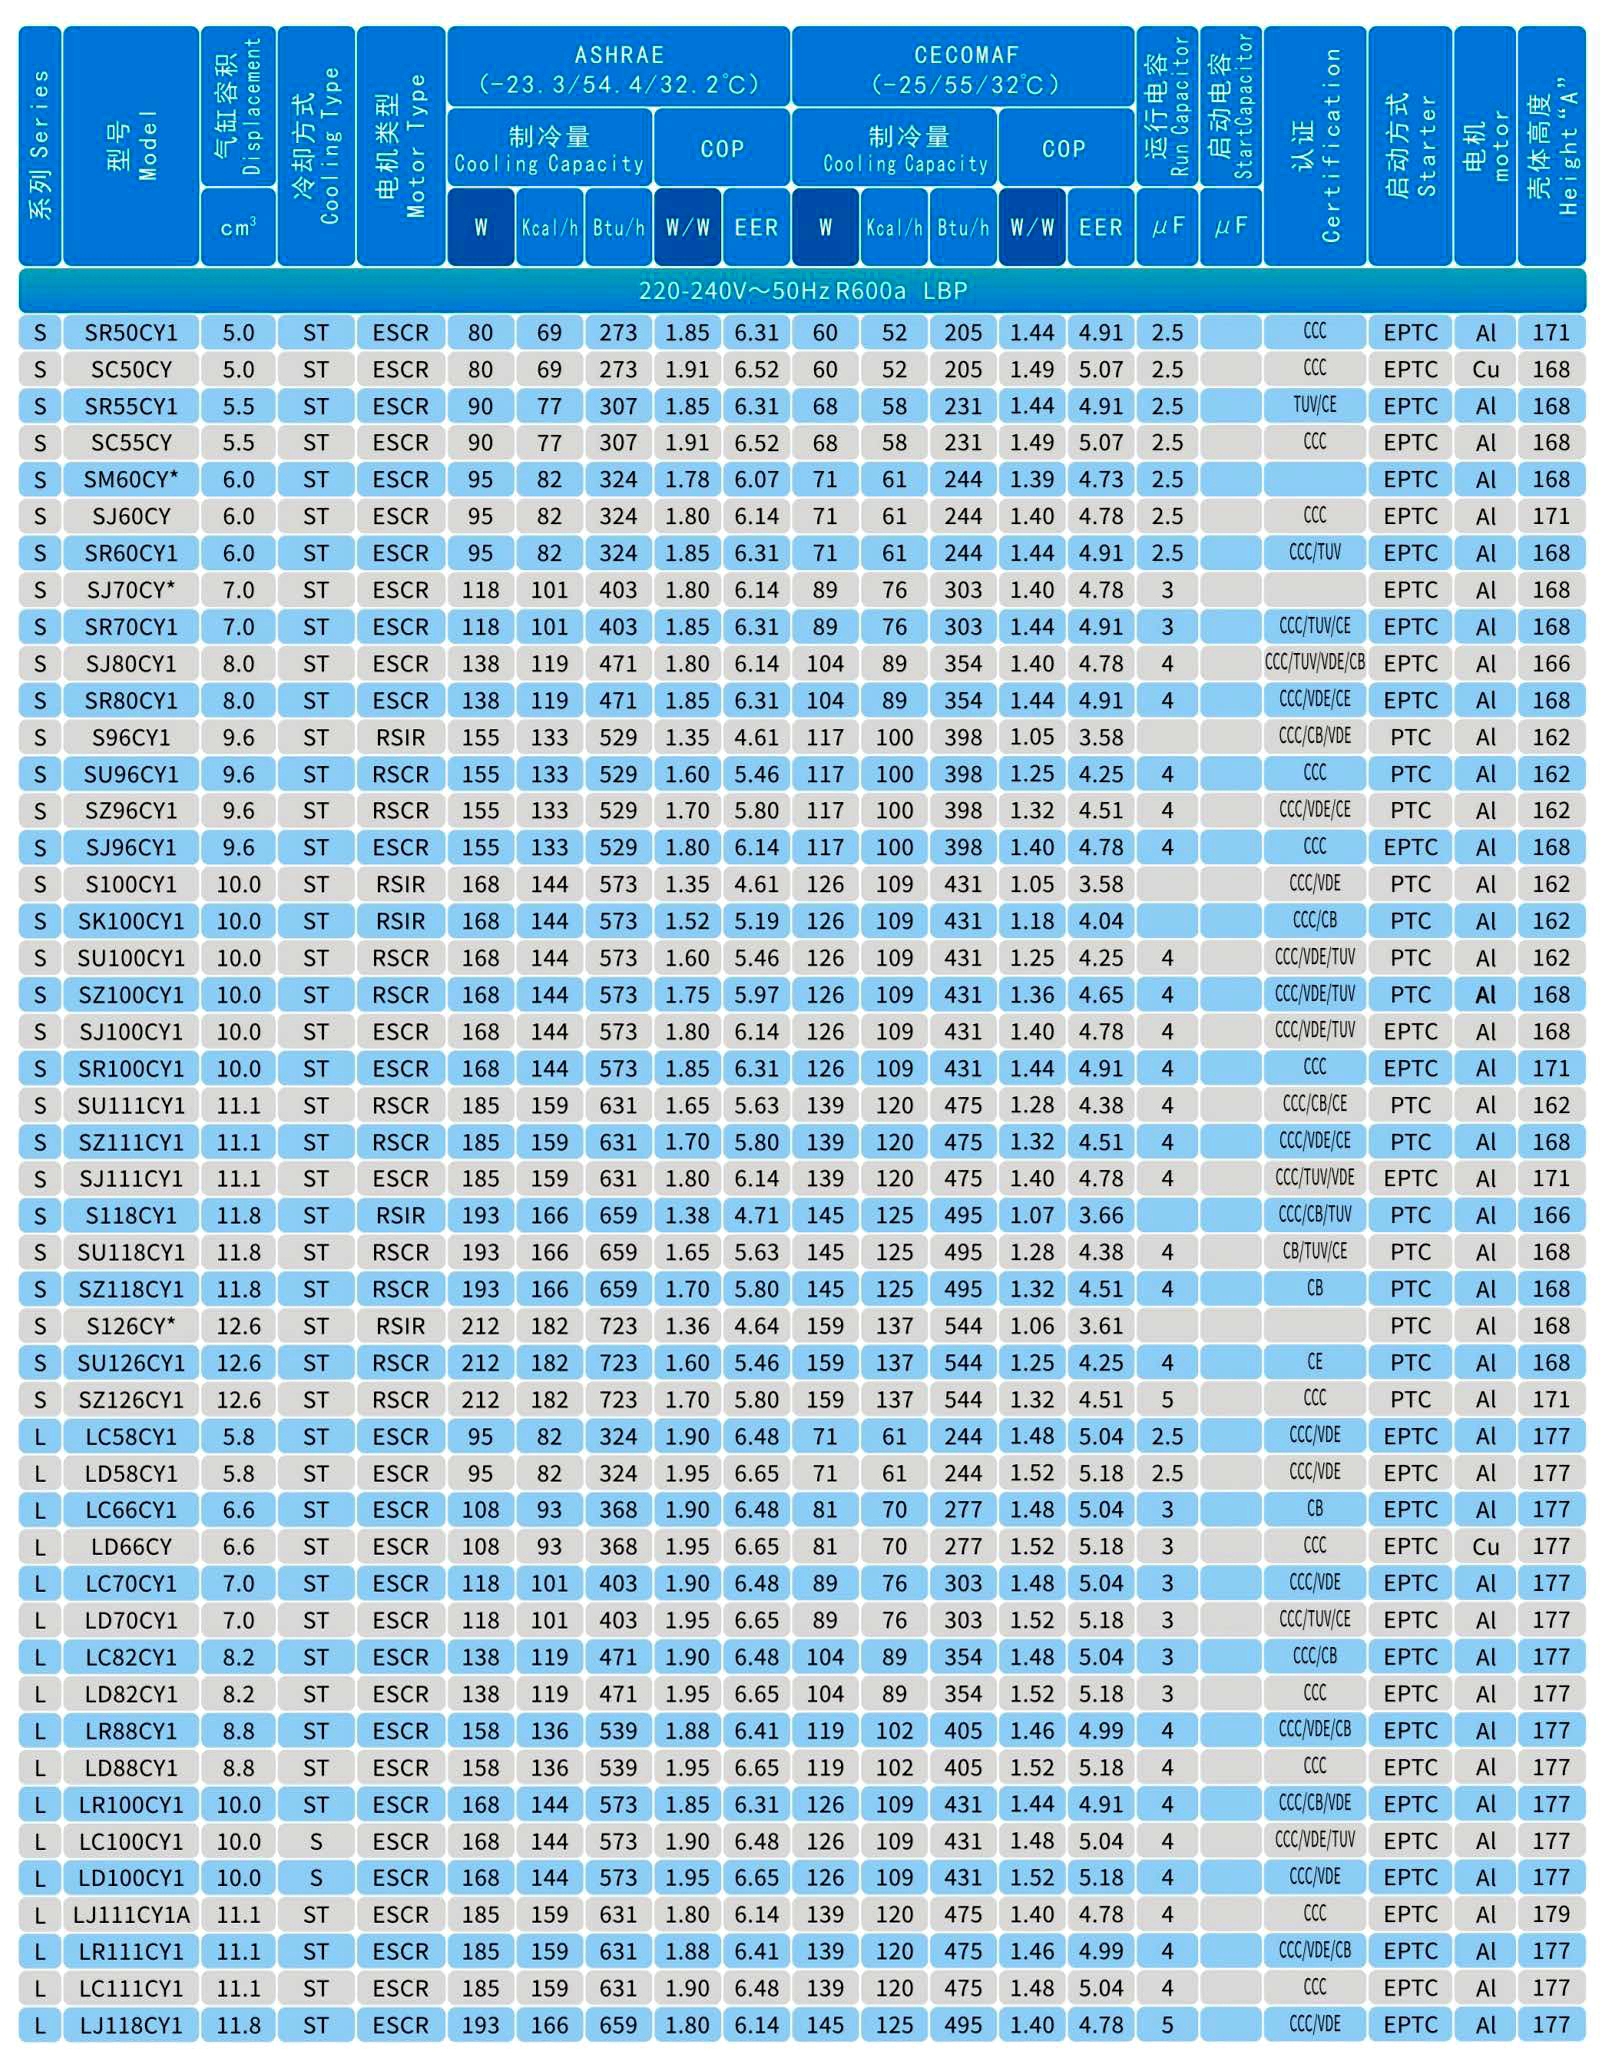
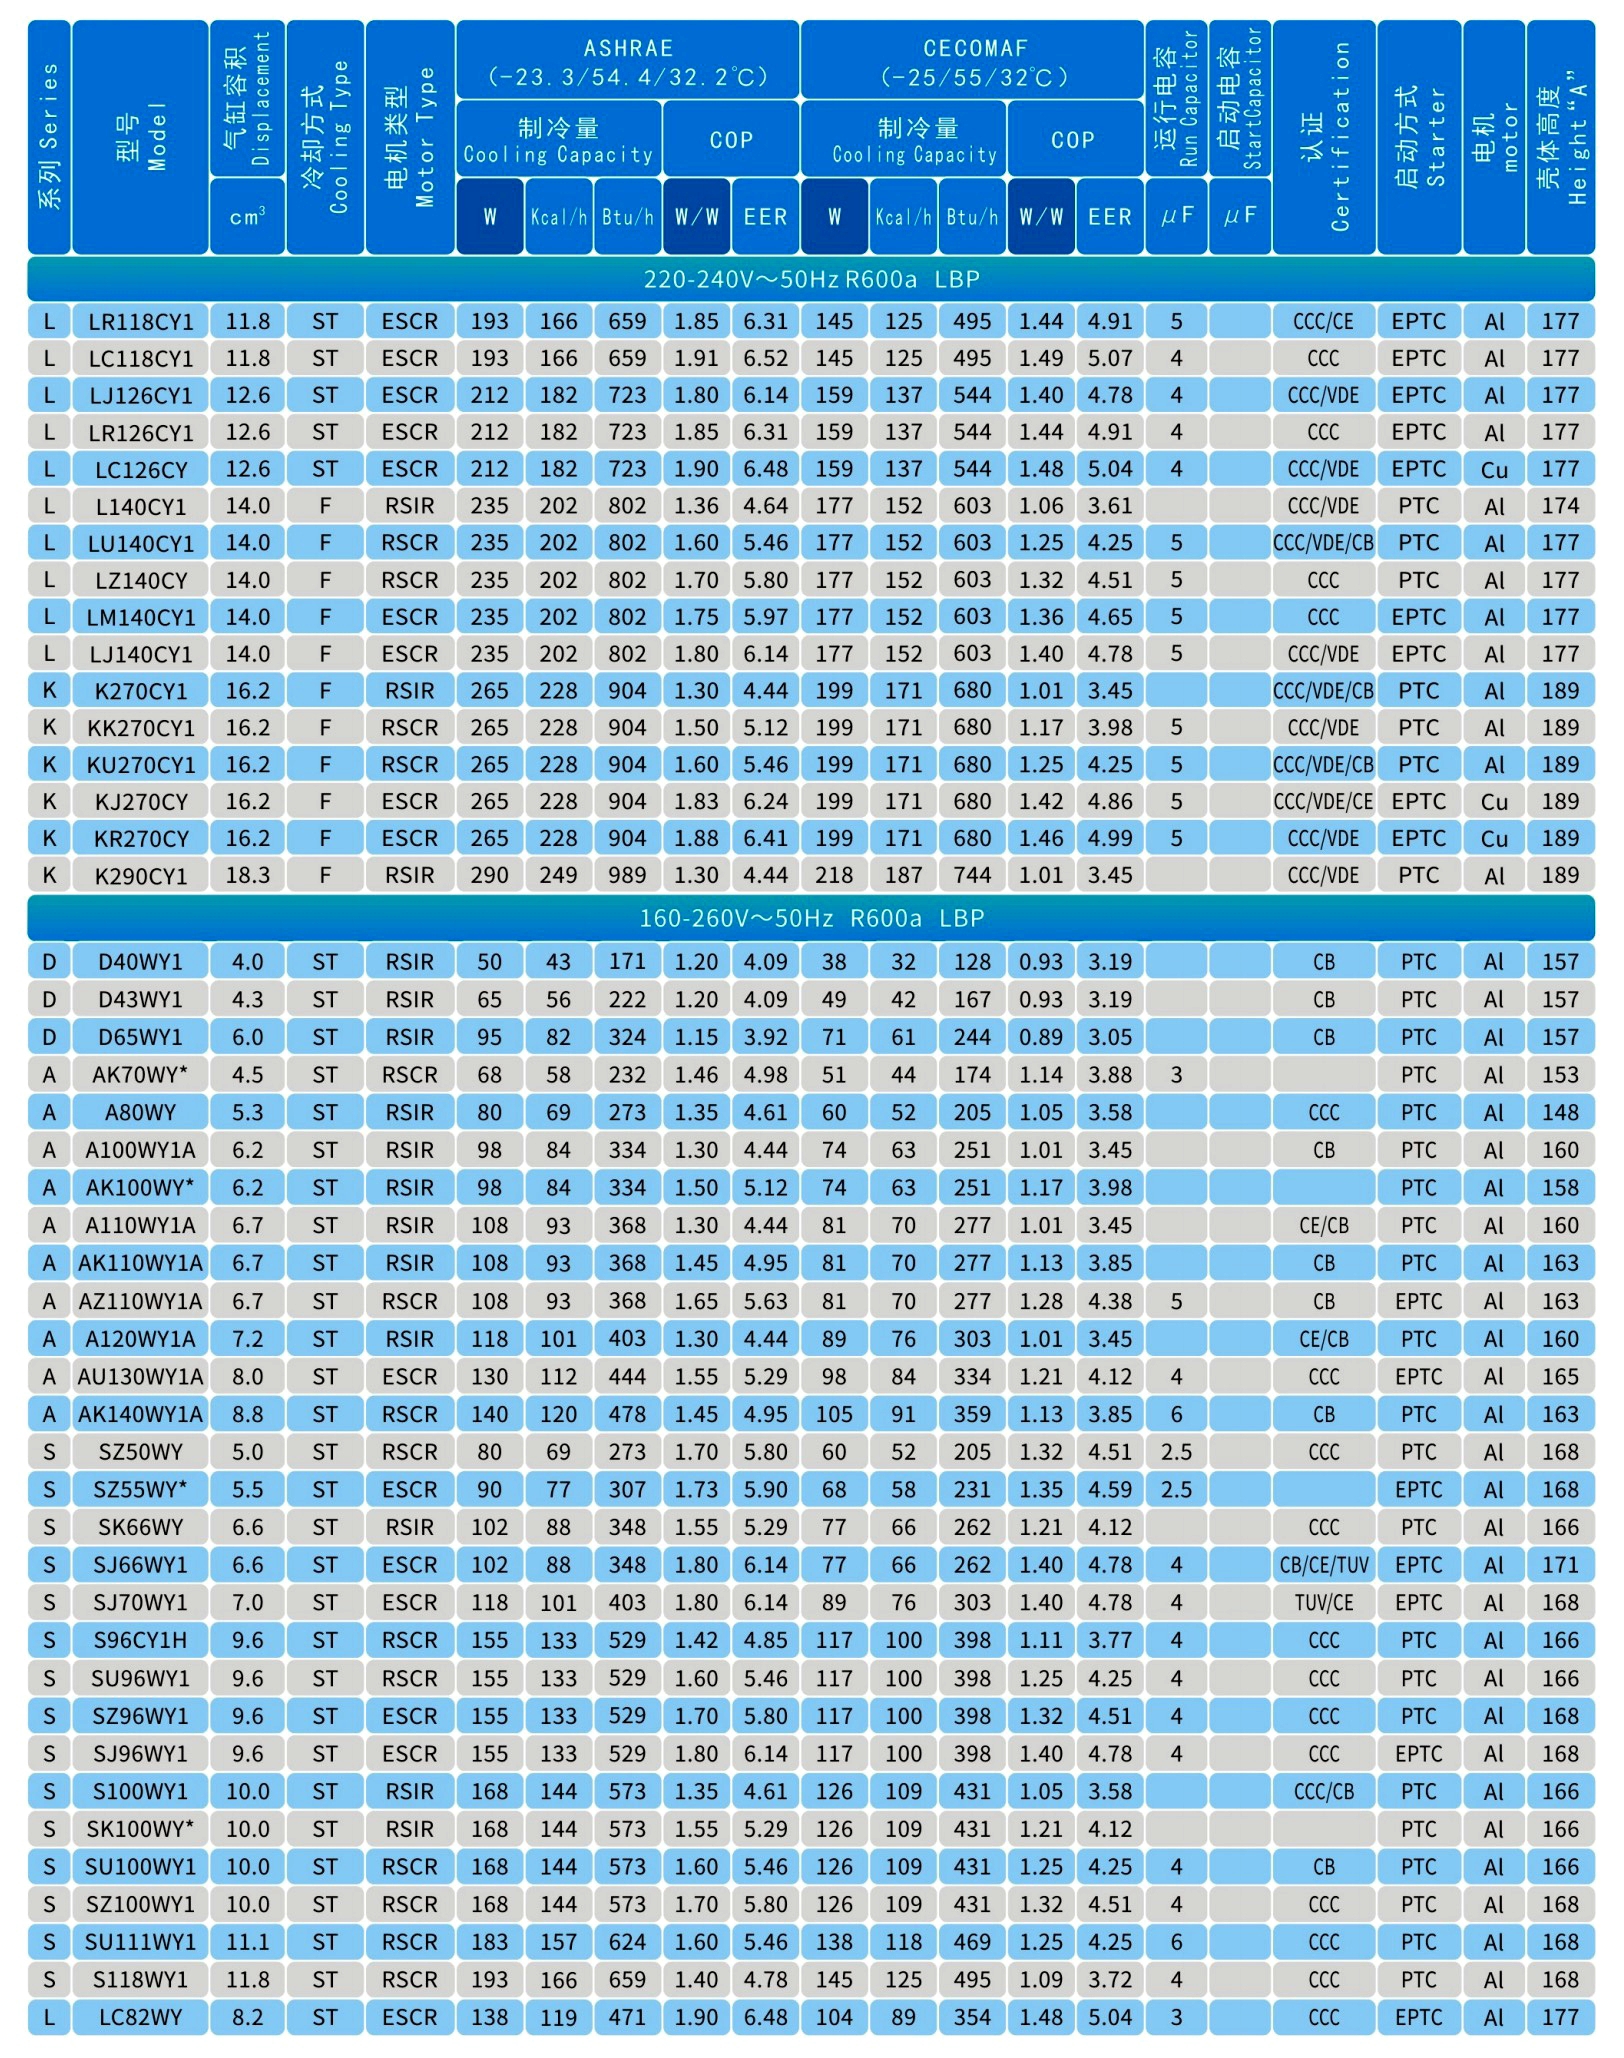
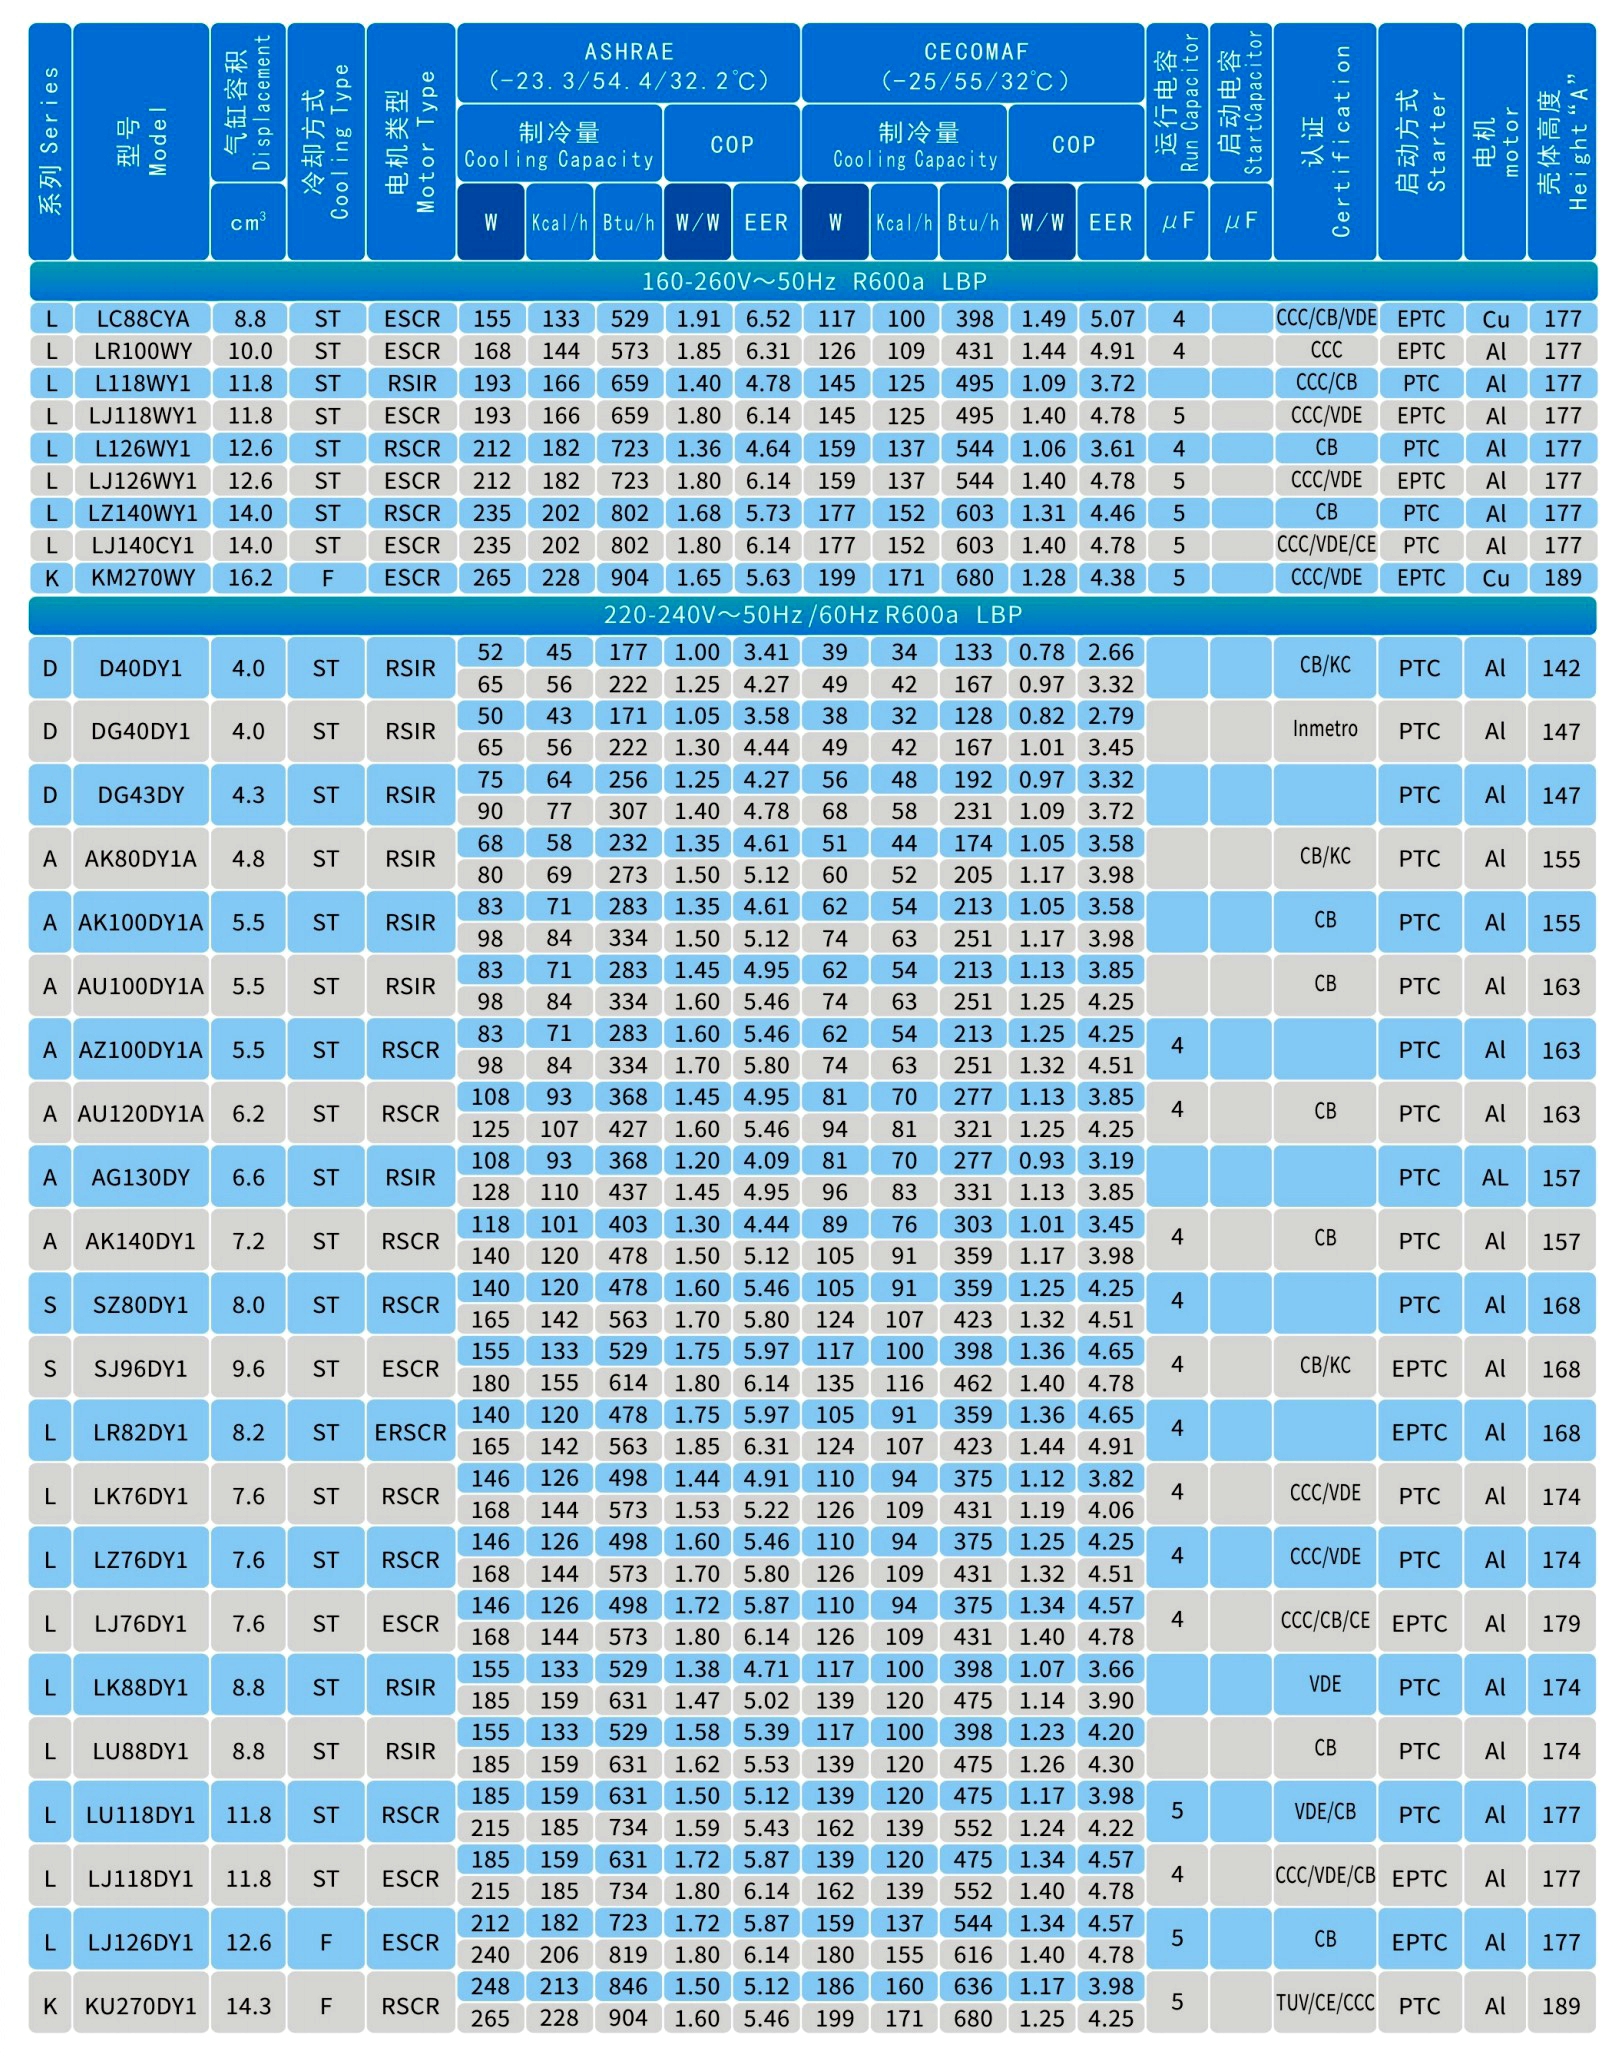
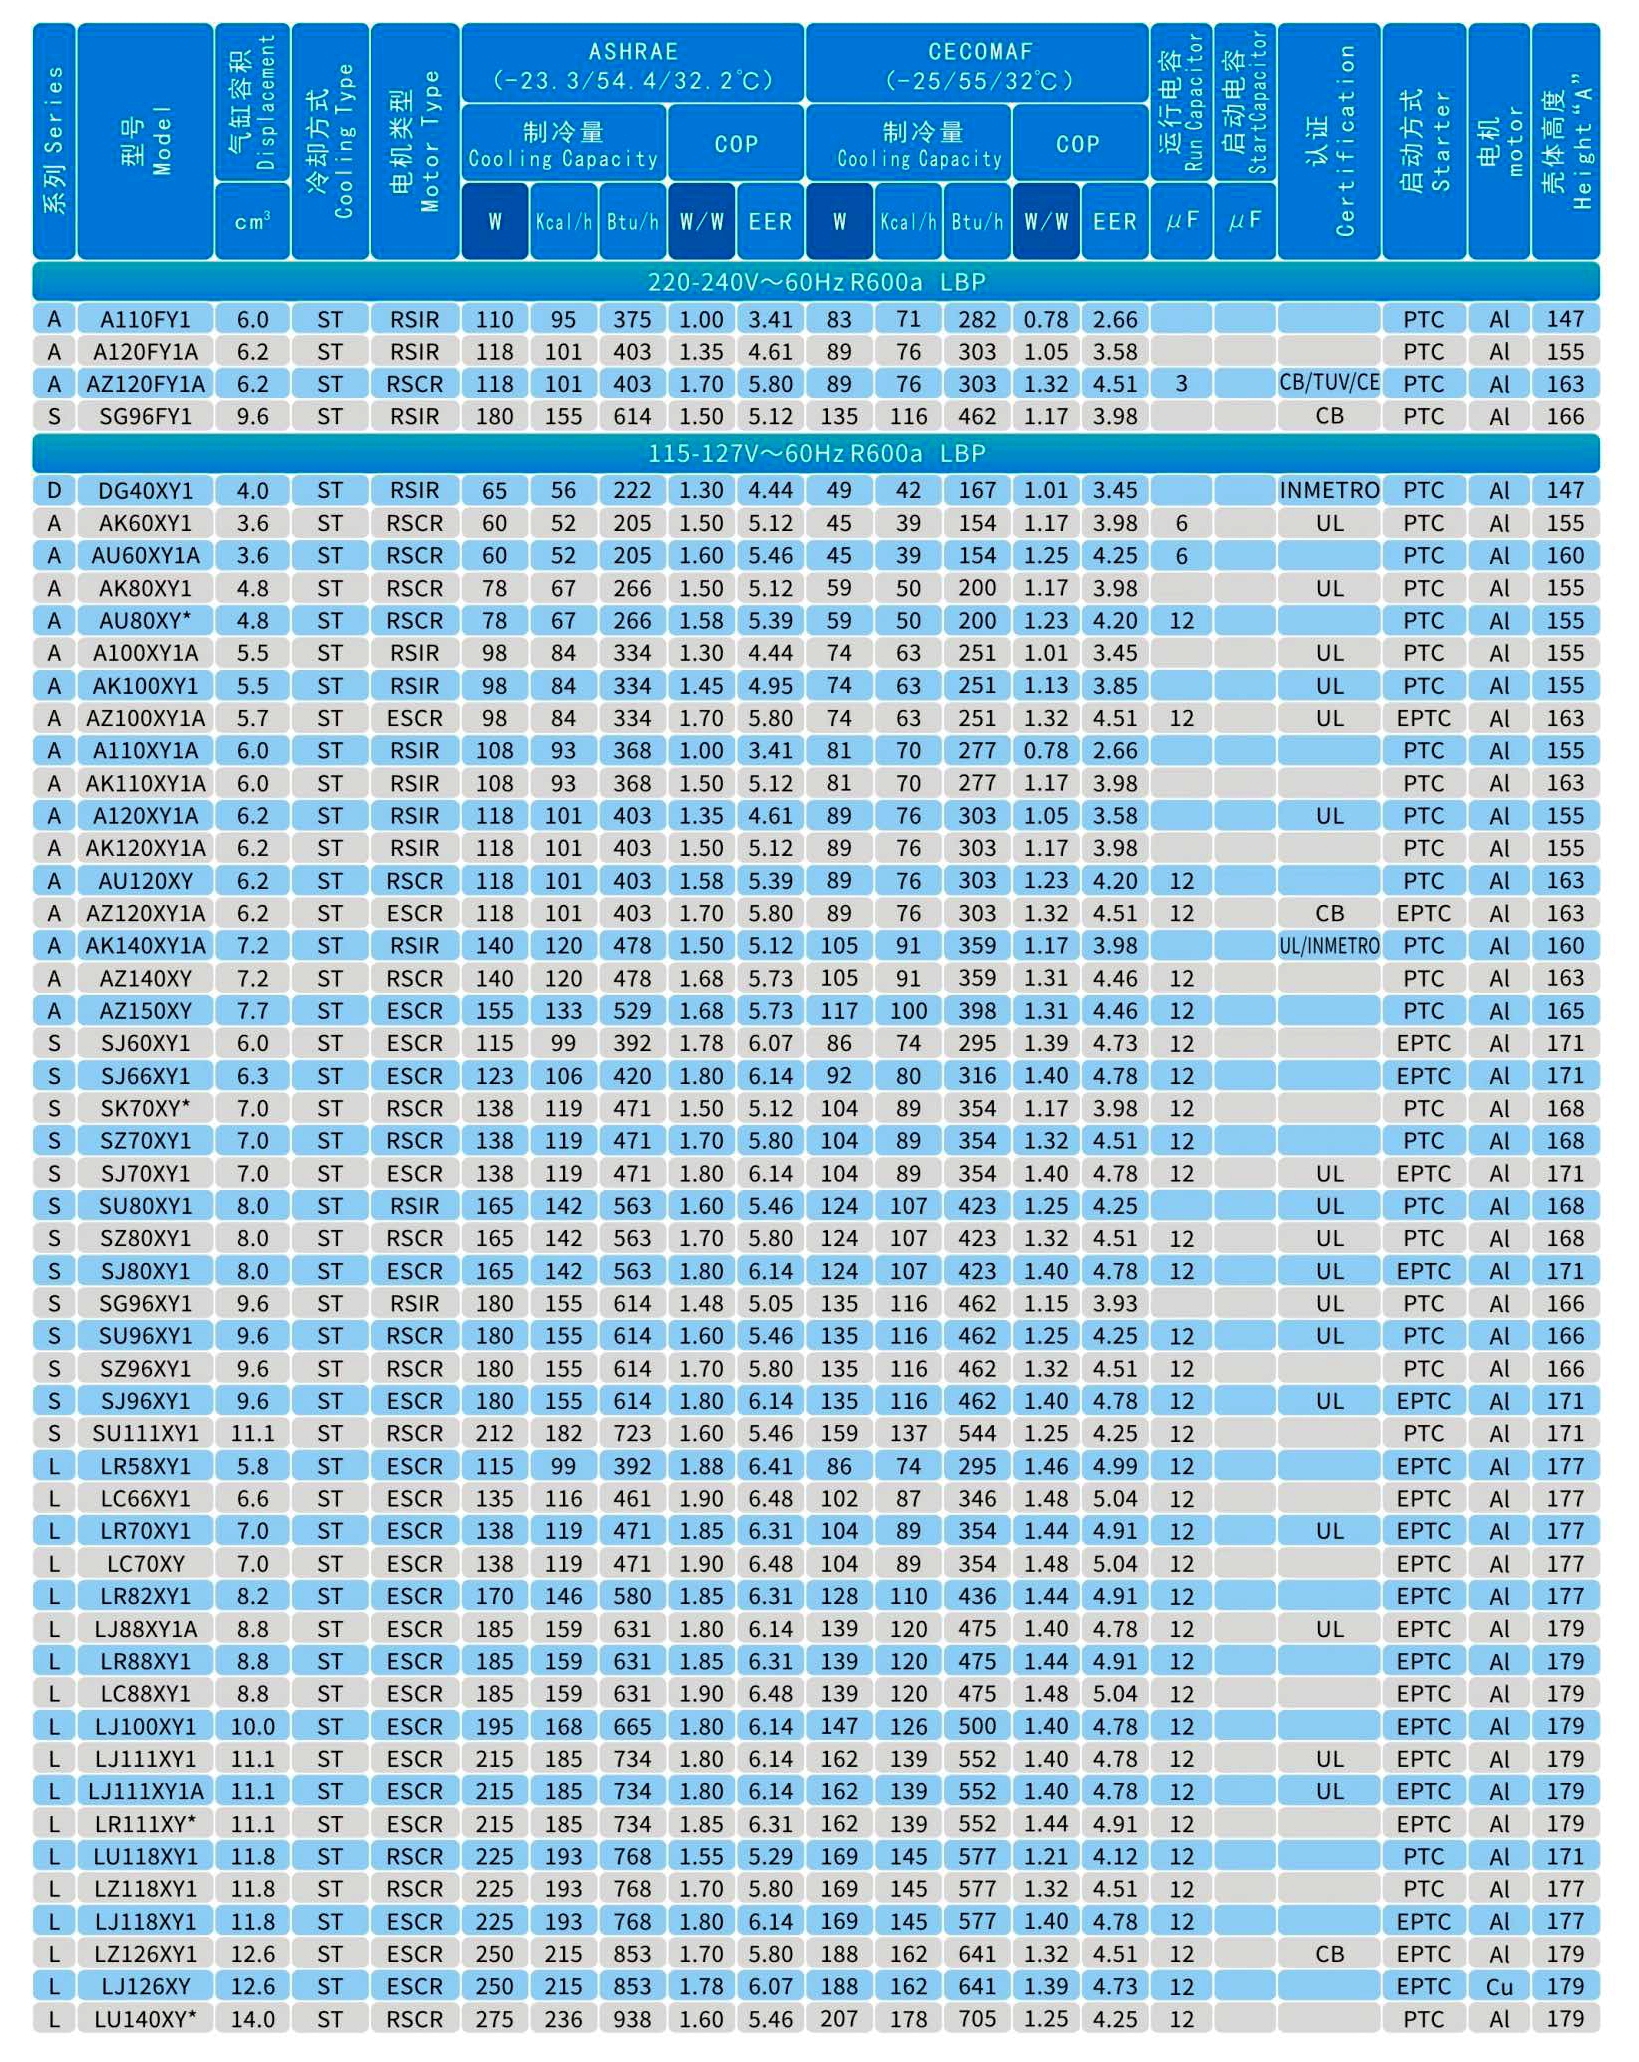
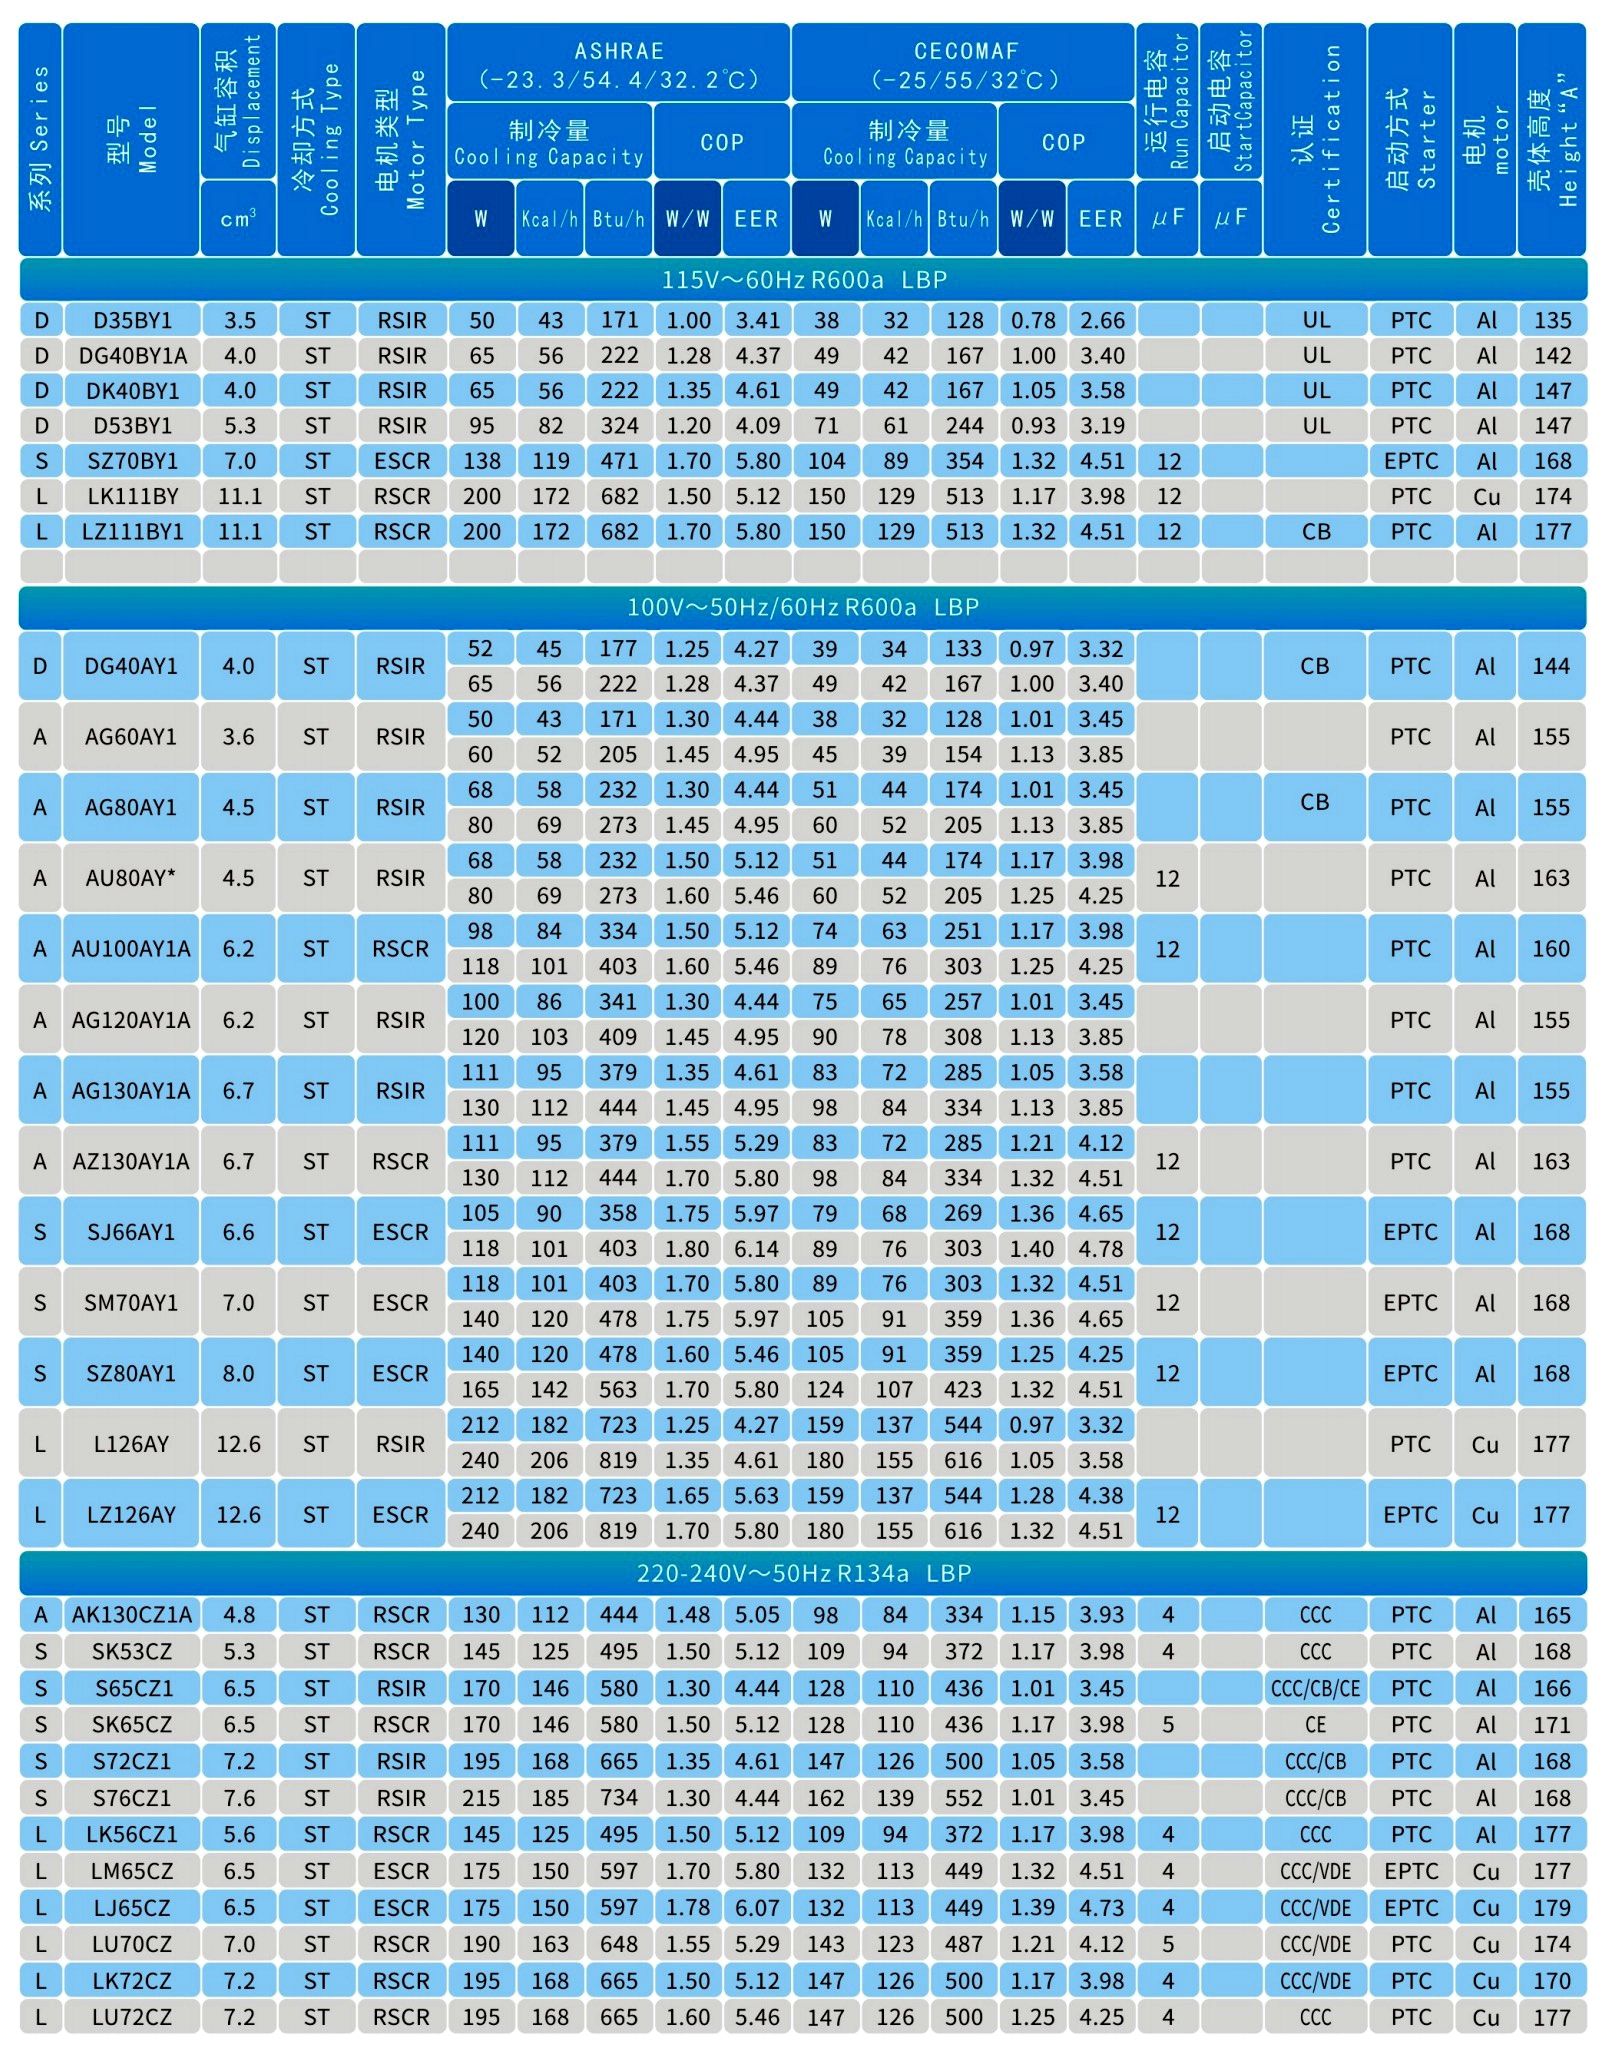
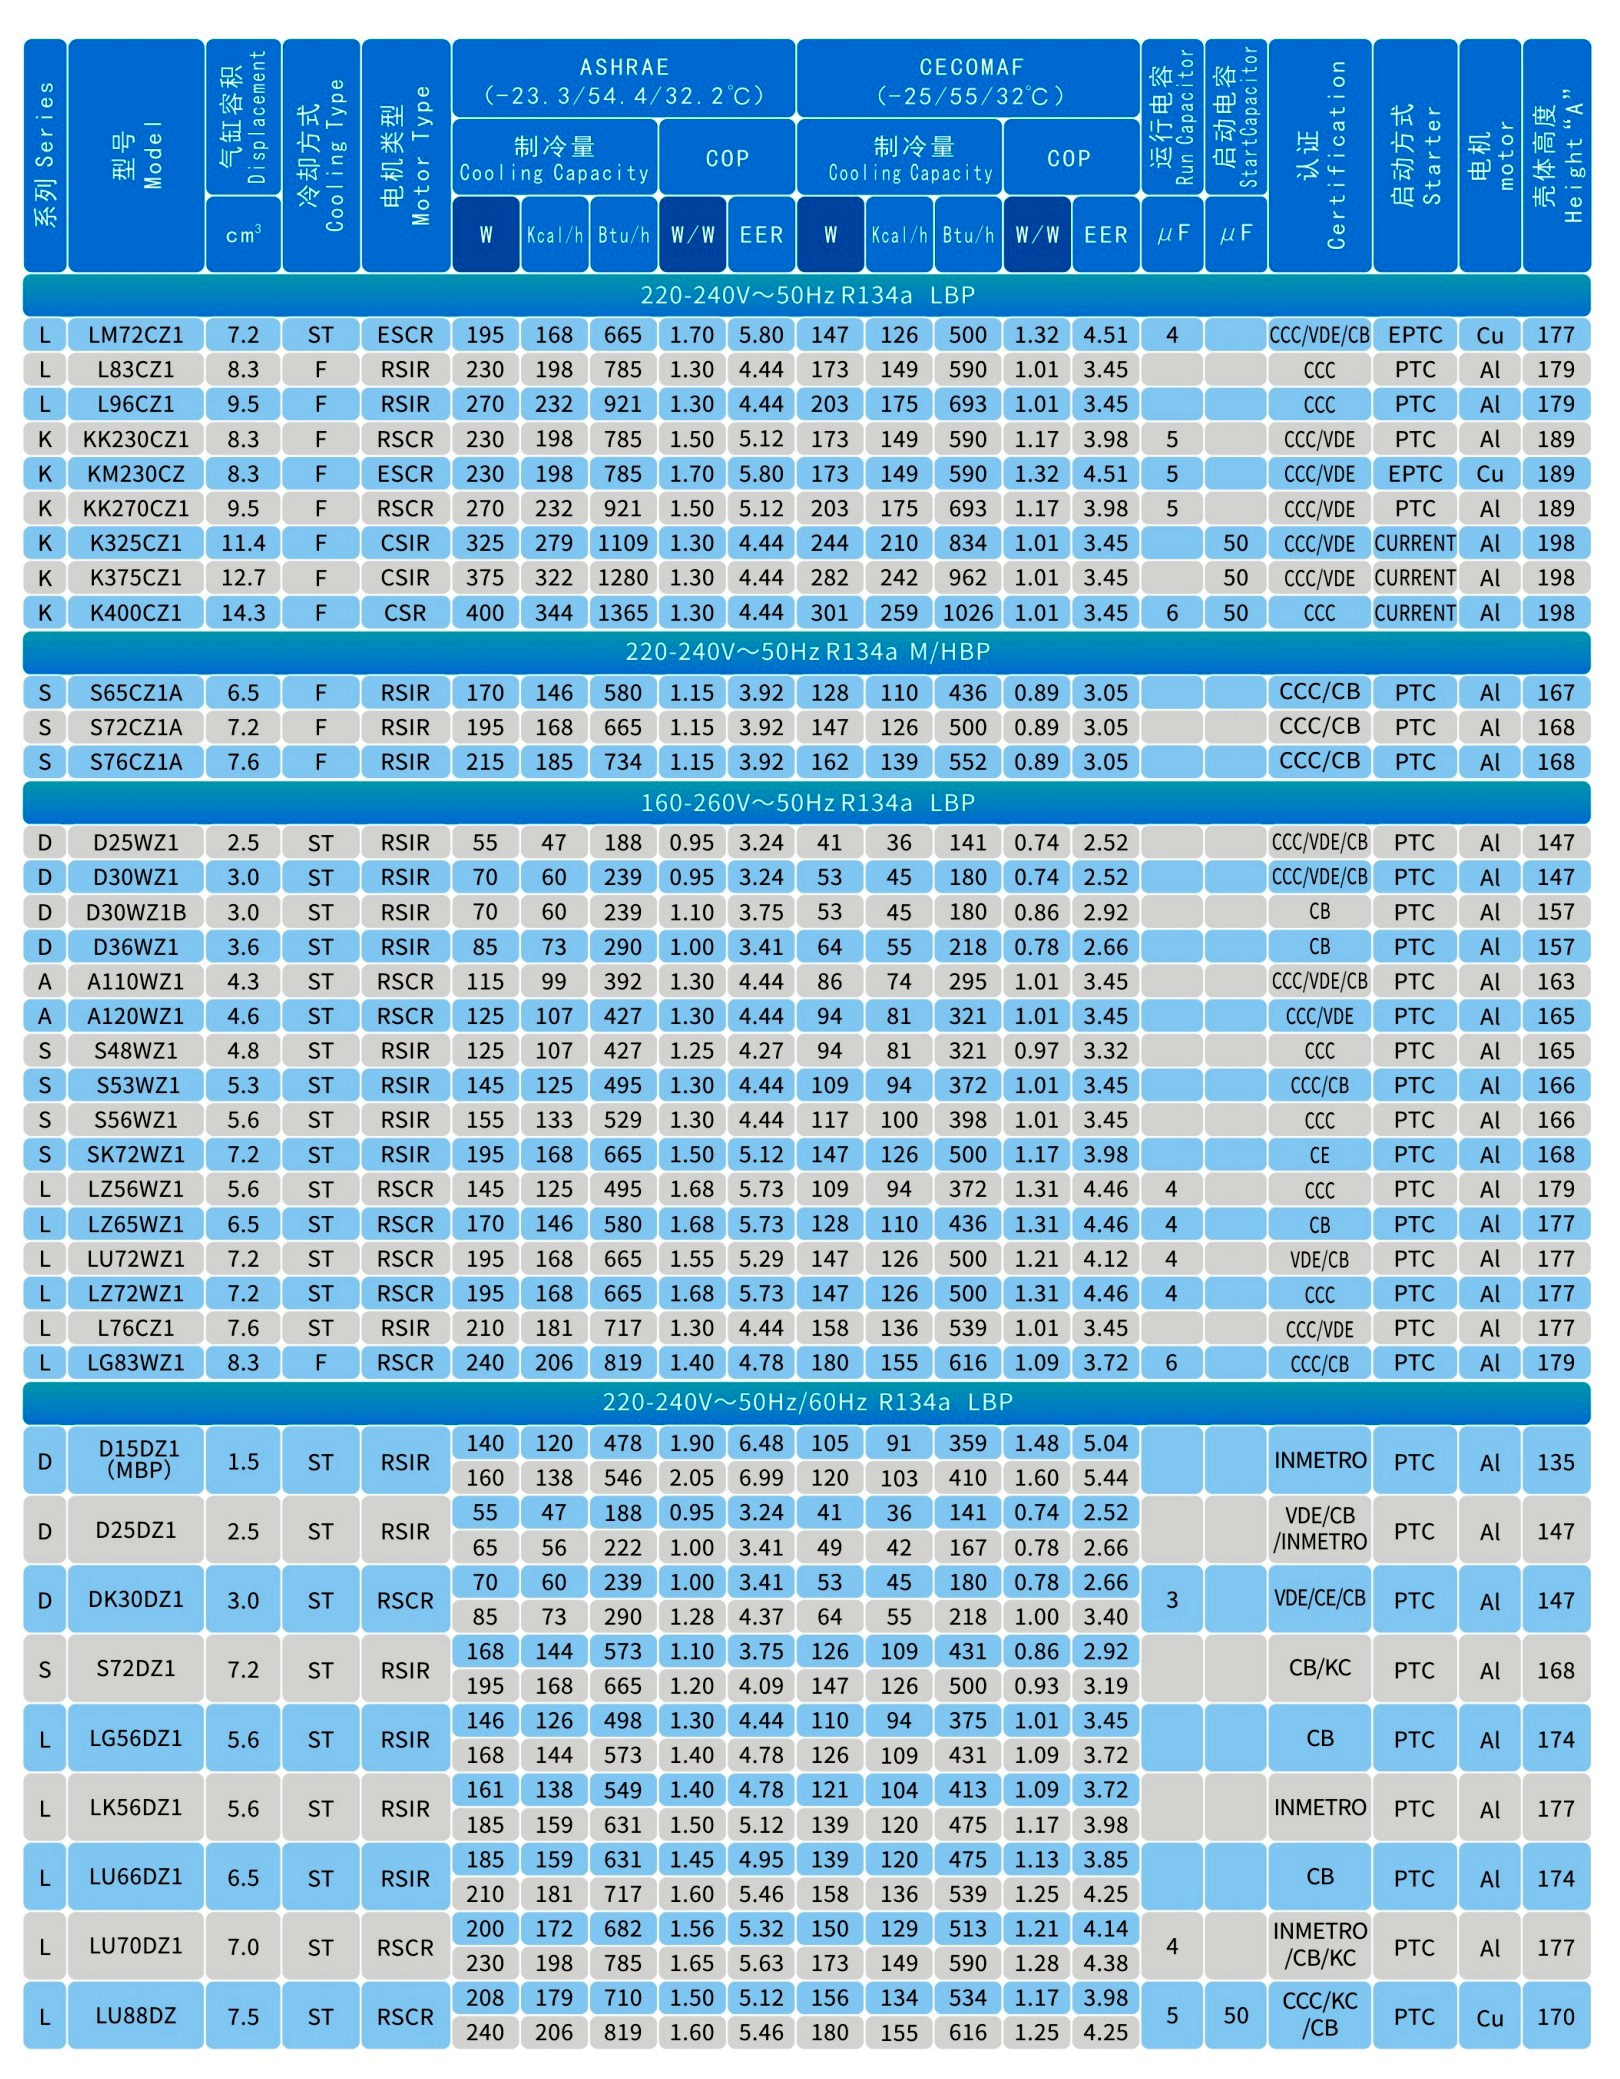
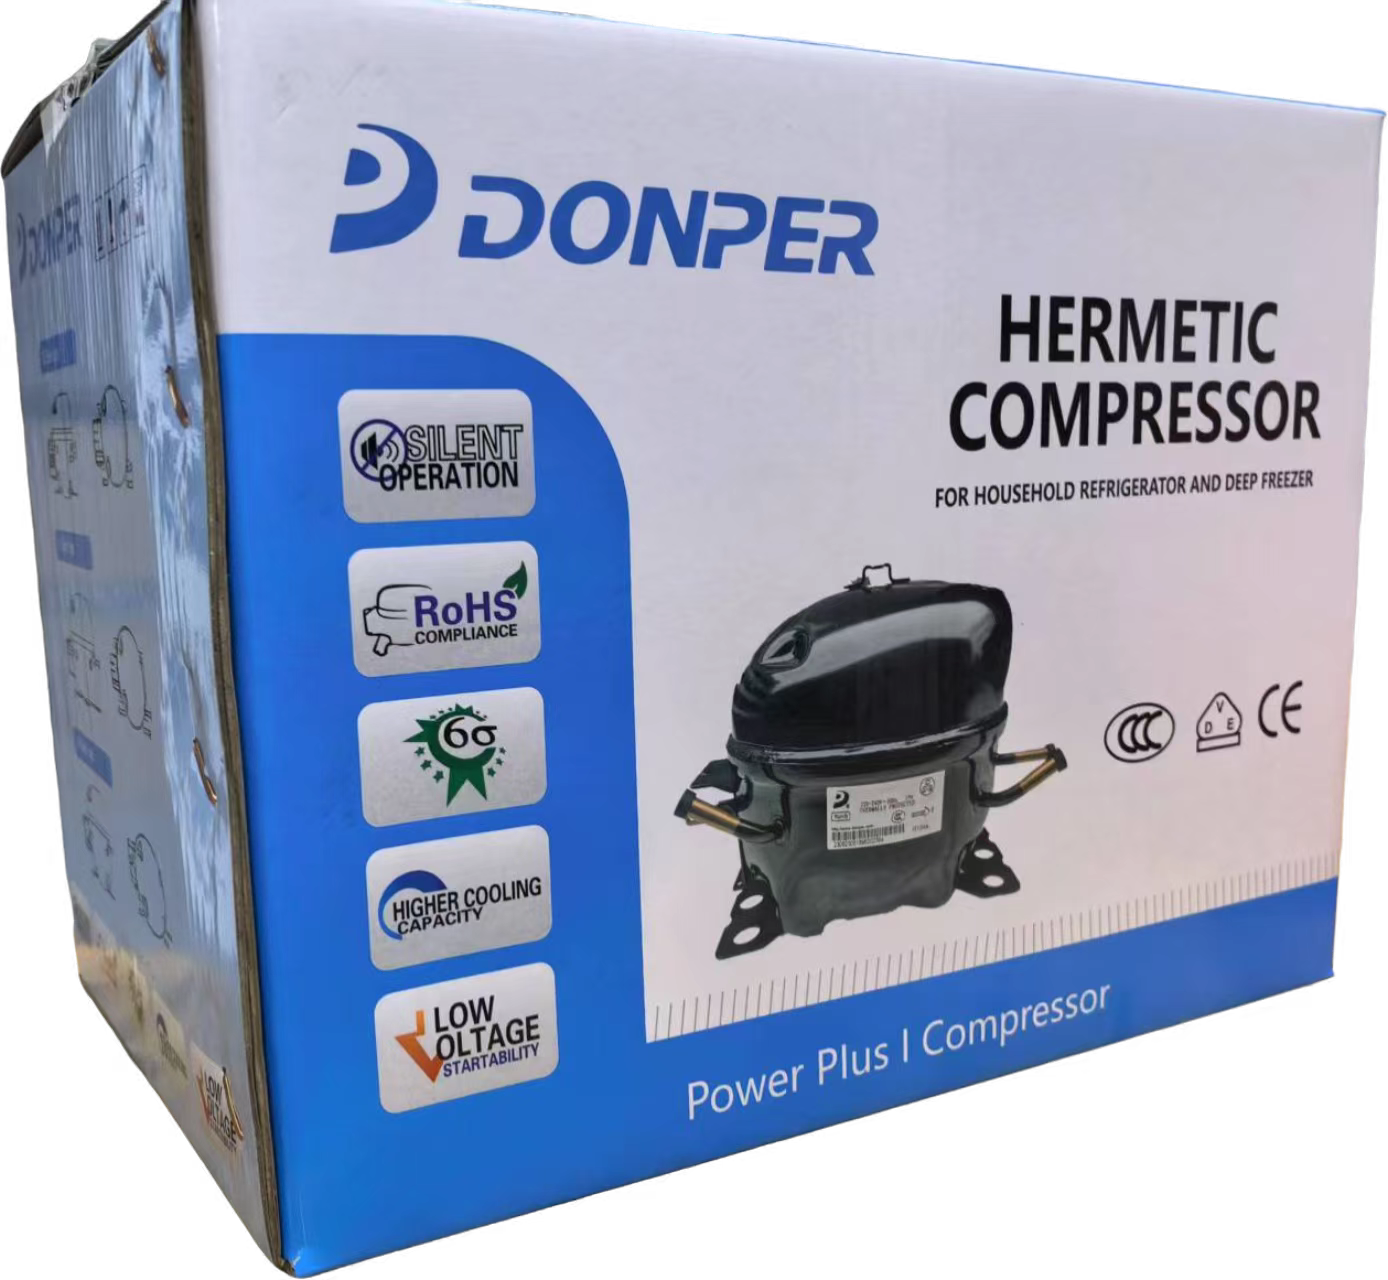
Description of DONPER compressor S100CY1
1. Basic parameters: The power is 129W, suitable for equipment such as air conditioners and chillers.
2. Structural type: It is a piston compressor, a fixed displacement type, and gas compression is achieved by the reciprocating motion of the piston in the cylinder.
3. Application areas: It can be used for Dongbei commercial freezers, freezers and other products to provide refrigeration power for these refrigeration equipment.
Performance characteristics of DONPER compressor S100CY1
1. Refrigeration capacity
The refrigeration capacity reaches 170W, which can provide stable and effective refrigeration power for refrigerators, freezers and other refrigeration equipment, meet the low temperature requirements of small refrigeration spaces of a certain volume, and ensure the refrigeration or freezing effect of internal items.
2. Energy consumption and power performance
The power is 129W. Among the same type of products, the power setting takes into account both refrigeration performance and energy consumption. It can provide the required refrigeration capacity while maintaining relatively reasonable power consumption. It has certain energy-saving advantages and is conducive to reducing the long-term operation cost of the equipment.
3. Structure and stability
It is a piston compressor with fixed displacement. This structure has been verified by the market for a long time and has mature technology. It has good operating stability. The reciprocating motion of the piston can ensure the reliability of the compression process. It is suitable for a variety of working conditions. The maintenance technology is relatively popular and accessories are easy to obtain.
4. Protection mechanism
It has thermal protection function. When the compressor is overheated due to long-term continuous operation, poor heat dissipation or excessive load, the thermal protection device will automatically play a role to avoid damage to the compressor due to overheating, extend its service life, and improve the safety and reliability of equipment operation.
DONPER compressor S100CY1 installation steps
Preparation before installation
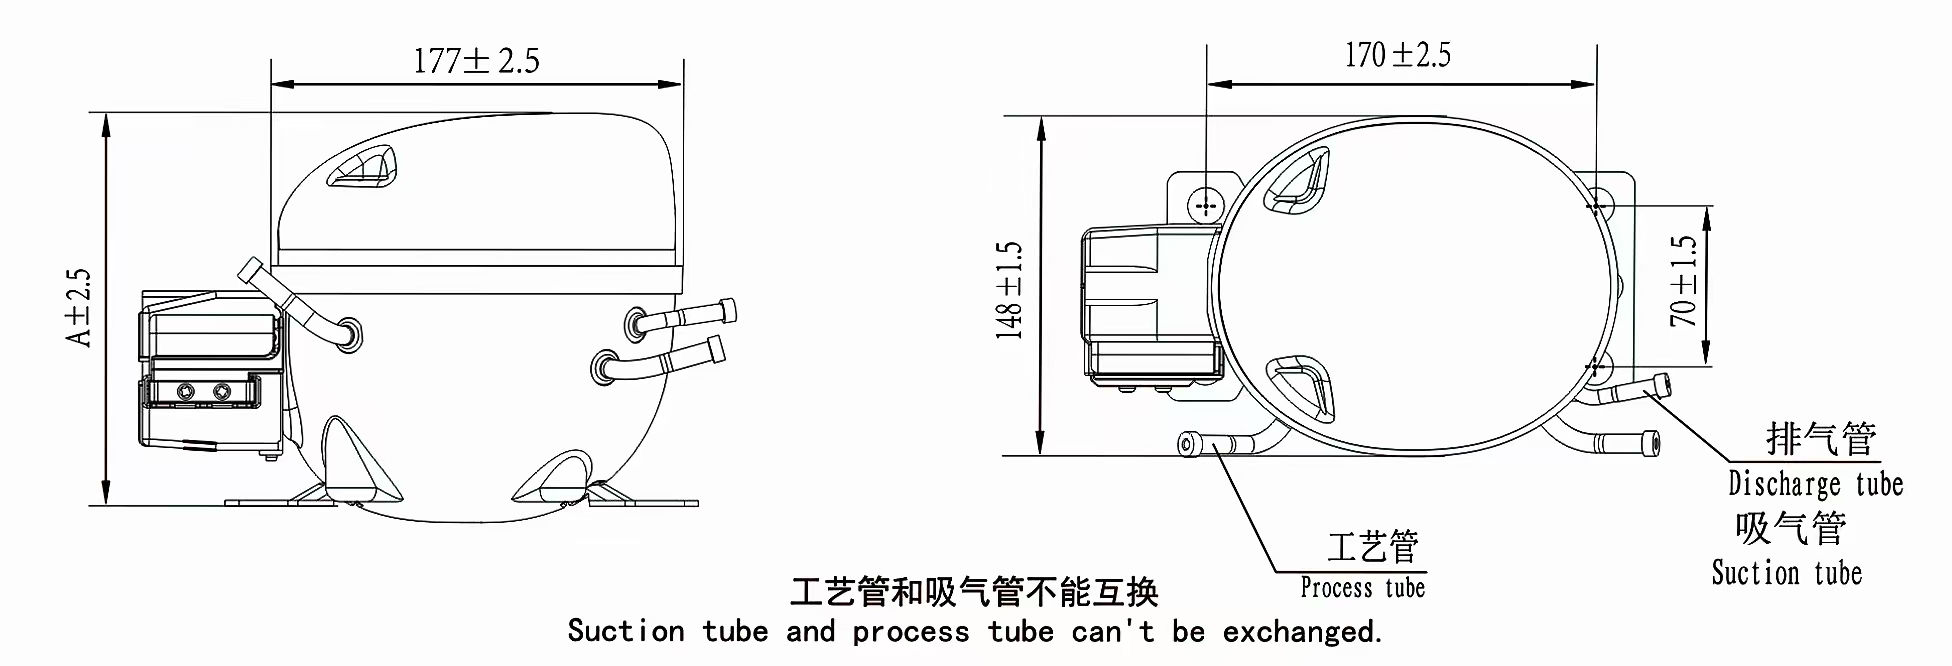
1. Confirm the model and integrity: carefully check that the compressor model is S100CY1, check whether the compressor appearance has bumps, damage, and whether the parts are complete.
2. Prepare tools: prepare common tools such as wrenches and screwdrivers, as well as welding equipment that may be used (if pipe welding connection is involved), vacuum pump (for vacuuming), refrigerant filling equipment, etc.
3. Determine the installation location: Choose a well-ventilated location away from heat sources and fire sources, and ensure that there is enough space around the compressor for heat dissipation and daily maintenance inspections. At the same time, ensure that the installation surface is flat and firm, and can withstand the vibration and weight of the compressor during operation.
Specific installation process
1. Fix the compressor: Use matching bolts, nuts and other connectors to install the compressor in a predetermined position, tighten the bolts to ensure that the compressor is stable and avoid shaking during operation.
2. Connect the pipeline
Cleaning the pipeline: Use a clean cloth or detergent to clean the inside of the suction pipe, exhaust pipe and other pipelines connected to the compressor to remove impurities, oil stains, etc.
Welding or connection: If the pipeline is connected by welding, it must be operated by professionals to ensure that the welding is firm and well sealed to avoid refrigerant leakage; if it is connected by quick connectors, etc., the pipeline must be correctly connected and tightened with the suction and exhaust ports of the compressor according to the corresponding specifications and operating requirements.
3. Electrical connection
Line inspection: Check whether the power cord, control line, etc. attached to the compressor are damaged or broken.
Wiring operation: Refer to the electrical wiring diagram on the compressor and correctly connect the power cord to the terminal of the compressor. There will generally be a common terminal (C), a running winding terminal (R), and a starting winding terminal (S) marked to ensure accurate wiring. If necessary, you can use a multimeter or other tools to assist in detection. If a capacitor needs to be connected, connect the capacitor correctly between the starting winding and the running winding. After the connection is completed, do a good job of insulating the line, such as wrapping the joints and other parts with insulating tape.
4. Vacuuming and refrigerant filling
Vacuuming: Use a vacuum pump to connect to the process port (or related interface) of the compressor to vacuum the refrigeration system to remove air and moisture in the system. Generally, it is necessary to evacuate to the specified vacuum degree (such as -0.1MPa) and maintain it for a certain period of time (such as 15-30 minutes) to ensure that the vacuum state in the system is good.
Refrigerant filling: According to the requirements of the compressor and refrigeration equipment, use professional refrigerant filling equipment to slowly add refrigerant according to the specified filling amount. During the filling process, pay attention to the changes in pressure and temperature to avoid overfilling or underfilling.
Debugging and inspection after installation
1. Preliminary inspection: Check the fixing of the compressor, whether the pipe connection is firm, whether the electrical line connection is correct, whether the insulation is good, etc.
2. Power-on test: Turn on the power, start the compressor, observe the start-up and operation of the compressor, listen to whether the running sound is normal, and whether there is any abnormal vibration or noise. Check whether the suction and exhaust pressures of the compressor are within the normal range, and whether the refrigeration effect of the refrigeration system meets the expectations.
3. Leak detection: Use soapy water or other leak detection liquid to apply to the pipe connection parts, welding points, valves and other locations to check whether there is any refrigerant leakage. If bubbles are found, it means there is a leak and it needs to be repaired in time.